概要
データベースアクセスを行うジョブを作成する。
なお、詳細についてはMacchinetta Batch 2.x 開発ガイドラインのデータベースアクセスを参照。
作成するアプリケーションの説明の 背景、処理概要、業務仕様を以下に再掲する。
背景
とある量販店では、会員に対してポイントカードを発行している。
会員には「ゴールド会員」「一般会員」の会員種別が存在し、会員種別に応じたサービスを提供している。
今回そのサービスの一環として、月内に商品を購入した会員のうち、
会員種別が「ゴールド会員」の場合は100ポイント、「一般会員」の場合は10ポイントを月末に加算することにした。
業務仕様
業務仕様は以下のとおり。
-
商品購入フラグが"1"(処理対象)の場合に、会員種別に応じてポイントを加算する
-
会員種別が"G"(ゴールド会員)の場合は100ポイント、"N"(一般会員)の場合は10ポイント加算する
-
-
商品購入フラグはポイント加算後に"0"(初期状態)に更新する
-
ポイントの上限値は1,000,000ポイントとする
-
ポイント加算後に1,000,000ポイントを超えた場合は、1,000,000ポイントに補正する
テーブル仕様
入出力リソースとなる会員情報テーブルの仕様は以下のとおり。
| No | 属性名 | カラム名 | PK | データ型 | 桁数 | 説明 |
|---|---|---|---|---|---|---|
1 |
会員番号 |
id |
CHAR |
8 |
会員を一意に示す8桁固定の番号を表す。 |
|
2 |
会員種別 |
type |
- |
CHAR |
1 |
会員の種別を以下のとおり表す。 |
3 |
商品購入フラグ |
status |
- |
CHAR |
1 |
月内に商品を買ったかどうかを表す。 |
4 |
ポイント |
point |
- |
INT |
7 |
会員の保有するポイントを表す。 |
|
テーブル仕様について
チュートリアルを実施するうえでの便宜を図り、 実際の業務に即したテーブル設計は行っていないため留意すること。 |
ジョブの概要
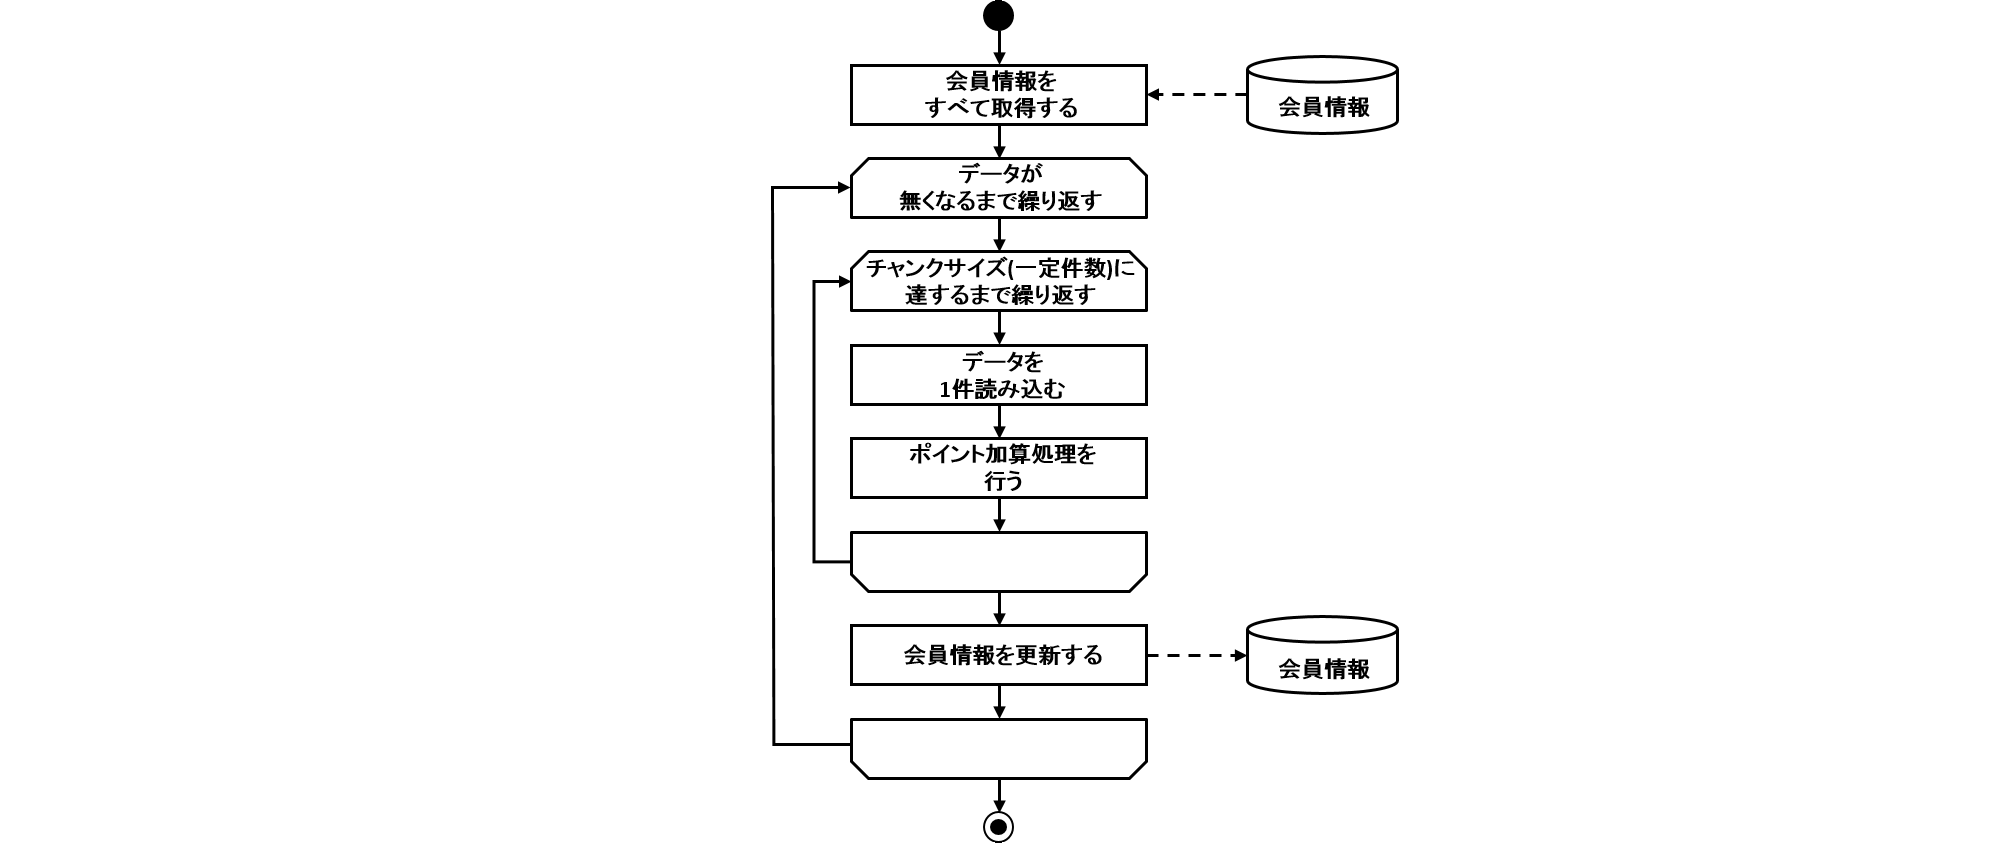
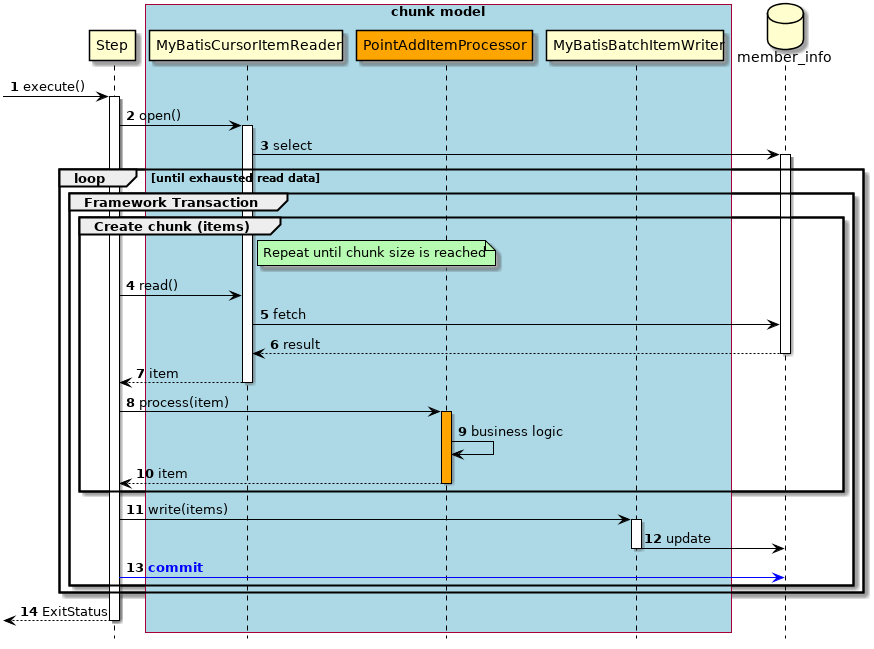
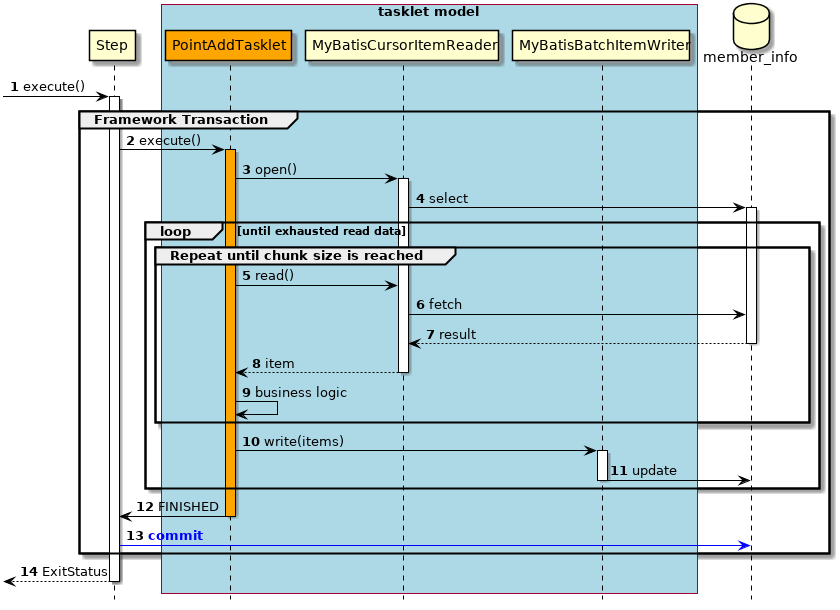
ここで作成するデータベースアクセスするジョブの概要を把握するために、 処理フローおよび処理シーケンスを以下に示す。
処理シーケンスではトランザクション制御の範囲について触れている。 ジョブのトランザクション制御はSpring Batchがもつ仕組みを利用しており、これをフレームワークトランザクションと定義して説明する。 トランザクション制御の詳細はトランザクション制御を参照。
- 処理フロー概要
-
処理フローの概要を以下に示す。

- チャンクモデルの場合の処理シーケンス
-
チャンクモデルの場合の処理シーケンスを説明する。
橙色のオブジェクトは今回実装するクラスを表す。

-
ジョブからステップが実行される。
-
ステップは、リソースをオープンする。
-
MyBatisCursorItemReaderは、member_infoテーブルから会員情報を取得するためのselect文を発行する。-
入力データがなくなるまで、以降の処理を繰り返す。
-
チャンク単位で、フレームワークトランザクションを開始する。
-
チャンクサイズに達するまで4から10までの処理を繰り返す。
-
-
ステップは、
MyBatisCursorItemReaderから入力データを1件取得する処理を行う。 -
MyBatisCursorItemReaderは、member_infoテーブルから入力データを1件取得する。 -
member_infoテーブルは、
MyBatisCursorItemReaderに入力データを返却する。 -
MyBatisCursorItemReaderは、ステップに入力データを返却する。 -
ステップは、
PointAddItemProcessorで入力データに対して処理を行う。 -
PointAddItemProcessorは、入力データを読み込んでポイント加算処理を行う。 -
PointAddItemProcessorは、ステップに処理結果を返却する。 -
ステップは、チャンクサイズ分のデータを
MyBatisBatchItemWriterで出力する。 -
MyBatisBatchItemWriterは、member_infoテーブルに対して会員情報の更新(update文の発行)を行う。 -
ステップはフレームワークトランザクションをコミットする。
-
ステップはジョブに終了コード(ここでは正常終了:0)を返却する。
|
Cursorについての説明
上記のシーケンス図を読み進める上で必要なCursorについての説明を行う。Cursorとは、検索結果がマッピングされたBeanの代わりにMyBatisCursorItemReaderにより1件ずつデータが返却される仕組みである。以下にCursorを用いた処理の流れについて説明する。
|
- タスクレットモデルの場合の処理シーケンス
-
タスクレットモデルの場合の処理シーケンスについて説明する。
このチュートリアルでは、タスクレットモデルでもチャンクモデルのように一定件数のデータをまとめて処理する方式としている。 大量データを効率的に処理できるなどのメリットがある。 詳細はチャンクモデルのコンポーネントを利用するTasklet実装を参照。
橙色のオブジェクトは今回実装するクラスを表す。

-
ジョブからステップが実行される。
-
ステップはフレームワークトランザクションを開始する。
-
-
ステップは
PointAddTaskletを実行する。 -
PointAddTaskletは、リソースをオープンする。 -
MyBatisCursorItemReaderは、member_infoテーブルから会員情報を取得するためのselect文を発行する。-
入力データがなくなるまで5から9までの処理を繰り返す。
-
一定件数に達するまで5から11までの処理を繰り返す。
-
-
PointAddTaskletは、MyBatisCursorItemReaderから入力データを1件取得する処理を行う。 -
MyBatisCursorItemReaderは、member_infoテーブルから入力データを1件取得する。 -
member_infoテーブルは、
MyBatisCursorItemReaderに入力データを返却する。 -
MyBatisCursorItemReaderは、タスクレットに入力データを返却する。 -
PointAddTaskletは、入力データを読み込んでポイント加算処理を行う。 -
PointAddTaskletは、一定件数分のデータをMyBatisBatchItemWriterで出力する。 -
MyBatisBatchItemWriterは、member_infoテーブルに対して会員情報の更新(update文の発行)を行う。 -
PointAddTaskletはステップへ処理終了を返却する。 -
ステップはフレームワークトランザクションをコミットする。
-
ステップはジョブに終了コード(ここでは正常終了:0)を返却する。
以降で、チャンクモデル、タスクレットモデルそれぞれの実装方法を説明する。
チャンクモデルでの実装
チャンクモデルでデータベースアクセスするジョブの作成から実行までを以下の手順で実施する。
ジョブBean定義ファイルの作成
Bean定義ファイルにて、チャンクモデルでデータベースアクセスを行うジョブを構成する要素の組み合わせ方を設定する。
ここでは、Bean定義ファイルの枠および共通的な設定のみ記述し、以降の項で各構成要素の設定を行う。
<?xml version="1.0" encoding="UTF-8"?>
<beans xmlns="http://www.springframework.org/schema/beans"
       xmlns:xsi="http://www.w3.org/2001/XMLSchema-instance"
       xmlns:context="http://www.springframework.org/schema/context"
       xmlns:batch="http://www.springframework.org/schema/batch"
       xmlns:p="http://www.springframework.org/schema/p"
       xmlns:mybatis="http://mybatis.org/schema/mybatis-spring"
       xsi:schemaLocation="http://www.springframework.org/schema/beans https://www.springframework.org/schema/beans/spring-beans.xsd
             http://www.springframework.org/schema/context https://www.springframework.org/schema/context/spring-context.xsd
             http://www.springframework.org/schema/batch https://www.springframework.org/schema/batch/spring-batch.xsd
             http://mybatis.org/schema/mybatis-spring http://mybatis.org/schema/mybatis-spring.xsd">

    <!-- (1) -->
    <import resource="classpath:META-INF/spring/job-base-context.xml"/>

    <!-- (2) -->
    <context:component-scan base-package="com.example.batch.tutorial.dbaccess.chunk"/>

</beans>| 項番 | 説明 |
|---|---|
(1) |
Macchinetta Batch 2.xを利用する際に、常に必要なBean定義を読み込む設定をインポートする。 |
(2) |
コンポーネントスキャンの設定を行う。 |
DTOの実装
業務データを保持するためのクラスとしてDTOクラスを実装する。
DTOクラスはテーブルごとに作成する。
チャンクモデル/タスクレットモデルで共通して利用するため、既に作成している場合は読み飛ばしてよい。
package com.example.batch.tutorial.common.dto;

public class MemberInfoDto {
    private String id; // (1)

    private String type; // (2)

    private String status; // (3)

    private int point; // (4)

    public String getId() {
        return id;
    }

    public void setId(String id) {
        this.id = id;
    }

    public String getType() {
        return type;
    }

    public void setType(String type) {
        this.type = type;
    }

    public String getStatus() {
        return status;
    }

    public void setStatus(String status) {
        this.status = status;
    }

    public int getPoint() {
        return point;
    }

    public void setPoint(int point) {
        this.point = point;
    }
}| 項番 | 説明 |
|---|---|
(1) |
会員番号に対応するフィールドとして |
(2) |
会員種別に対応するフィールドとして |
(3) |
商品購入フラグに対応するフィールドとして |
(4) |
ポイントに対応するフィールドとして |
MyBatisによるデータベースアクセスの定義
MyBatisを利用してデータベースアクセスするための実装・設定を行う。
以下の作業を実施する。
チャンクモデル/タスクレットモデルで共通して利用するため、既に作成している場合は読み飛ばしてよい。
Repositoryインタフェースの実装
MapperXMLファイルに定義したSQLを呼び出すためのインタフェースを実装する。
このインタフェースに対する実装クラスは、MyBatisが自動で生成するため、開発者はインタフェースのみ作成すればよい。
package com.example.batch.tutorial.common.repository;

import com.example.batch.tutorial.common.dto.MemberInfoDto;
import org.apache.ibatis.cursor.Cursor;

public interface MemberInfoRepository {
  Cursor<MemberInfoDto> cursor(); // (1)

  int updatePointAndStatus(MemberInfoDto memberInfo); // (2)
}| 項番 | 説明 |
|---|---|
(1) |
MapperXMLファイルに定義するSQLのIDに対応するメソッドを定義する。 |
(2) |
ここでは、member_infoテーブルのpointカラムとstatusカラムを更新するためのメソッドを定義する。 |
MapperXMLファイルの作成
SQLとO/Rマッピングの設定を記載するMapperXMLファイルを作成する。
MapperXMLファイルは、Repositoryインタフェースごとに作成する。
MyBatisが定めたルールに則ったディレクトリに格納することで、自動的にMapperXMLファイルを読み込むことができる。 MapperXMLファイルを自動的に読み込ませるために、Repositoryインタフェースのパッケージ階層と同じ階層のディレクトリにMapperXMLファイルを格納する。
<?xml version="1.0" encoding="UTF-8"?>
<!DOCTYPE mapper PUBLIC "-//mybatis.org//DTD Mapper 3.0//EN"
        "http://mybatis.org/dtd/mybatis-3-mapper.dtd">

<!-- (1) -->
<mapper namespace="com.example.batch.tutorial.common.repository.MemberInfoRepository">

    <!-- (2) -->
    <select id="cursor" resultType="com.example.batch.tutorial.common.dto.MemberInfoDto">
        SELECT
            id,
            type,
            status,
            point
        FROM
            member_info
        ORDER BY
            id ASC
    </select>

    <!-- (3) -->
    <update id="updatePointAndStatus" parameterType="com.example.batch.tutorial.common.dto.MemberInfoDto">
        UPDATE
            member_info
        SET
            status = #{status},
            point = #{point}
        WHERE
            id = #{id}
    </update>
</mapper>| 項番 | 説明 |
|---|---|
(1) |
|
(2) |
参照系のSQLの設定を行う。 |
(3) |
更新系のSQLの設定を行う。 |
ジョブBean定義ファイルの設定
MyBatisによるデータベースアクセスするための設定として、ジョブBean定義ファイルに以下の(1)~(3)を追記する。
<?xml version="1.0" encoding="UTF-8"?>
<beans xmlns="http://www.springframework.org/schema/beans"
       xmlns:xsi="http://www.w3.org/2001/XMLSchema-instance"
       xmlns:context="http://www.springframework.org/schema/context"
       xmlns:batch="http://www.springframework.org/schema/batch"
       xmlns:p="http://www.springframework.org/schema/p"
       xmlns:mybatis="http://mybatis.org/schema/mybatis-spring"
       xsi:schemaLocation="http://www.springframework.org/schema/beans https://www.springframework.org/schema/beans/spring-beans.xsd
             http://www.springframework.org/schema/context https://www.springframework.org/schema/context/spring-context.xsd
             http://www.springframework.org/schema/batch https://www.springframework.org/schema/batch/spring-batch.xsd
             http://mybatis.org/schema/mybatis-spring http://mybatis.org/schema/mybatis-spring.xsd">

    <import resource="classpath:META-INF/spring/job-base-context.xml"/>

    <context:component-scan base-package="com.example.batch.tutorial.dbaccess.chunk"/>

    <!-- (1) -->
    <mybatis:scan base-package="com.example.batch.tutorial.common.repository" factory-ref="jobSqlSessionFactory"/>

    <!-- (2) -->
    <bean id="reader"
          class="org.mybatis.spring.batch.MyBatisCursorItemReader"
          p:queryId="com.example.batch.tutorial.common.repository.MemberInfoRepository.cursor"
          p:sqlSessionFactory-ref="jobSqlSessionFactory"/>

    <!-- (3) -->
    <bean id="writer" class="org.mybatis.spring.batch.MyBatisBatchItemWriter"
          p:statementId="com.example.batch.tutorial.common.repository.MemberInfoRepository.updatePointAndStatus"
          p:sqlSessionTemplate-ref="batchModeSqlSessionTemplate"/>

</beans>| 項番 | 説明 |
|---|---|
(1) |
Repositoryインタフェースをスキャンするための設定を行う。 |
(2) |
ItemReaderの設定を行う。 |
(3) |
ItemWriterの設定を行う。 |
|
ItemReader・ItemWriter以外のデータベースアクセス
ItemReader・ItemWriter以外でデータベースアクセスする方法として、Mapperインタフェースを利用する方法がある。 Mapperインタフェースを利用するにあたっては、Macchinetta Batch 2.xとして制約を設けているため、 Mapperインタフェース(入力)、Mapperインタフェース(出力)を参照してほしい。 ItemProcessorの実装例は、チャンクモデルにおける利用方法(入力)、 チャンクモデルにおける利用方法(出力)を参照。 |
ロジックの実装
ポイント加算処理を行うビジネスロジッククラスを実装する。
以下の作業を実施する。
PointAddItemProcessorクラスの実装
ItemProcessorインタフェースを実装したPointAddItemProcessorクラスを実装する。
package com.example.batch.tutorial.dbaccess.chunk;

import org.springframework.batch.item.ItemProcessor;
import org.springframework.stereotype.Component;
import com.example.batch.tutorial.common.dto.MemberInfoDto;

@Component // (1)
public class PointAddItemProcessor implements ItemProcessor<MemberInfoDto, MemberInfoDto> { // (2)

    private static final String TARGET_STATUS = "1"; // (3)

    private static final String INITIAL_STATUS = "0"; // (4)

    private static final String GOLD_MEMBER = "G"; // (5)

    private static final String NORMAL_MEMBER = "N"; // (6)

    private static final int MAX_POINT = 1000000; // (7)

    @Override
    public MemberInfoDto process(MemberInfoDto item) throws Exception { // (8) (9) (10)
        if (TARGET_STATUS.equals(item.getStatus())) {
            if (GOLD_MEMBER.equals(item.getType())) {
                item.setPoint(item.getPoint() + 100);
            } else if (NORMAL_MEMBER.equals(item.getType())) {
                item.setPoint(item.getPoint() + 10);
            }

            if (item.getPoint() > MAX_POINT) {
                item.setPoint(MAX_POINT);
            }

            item.setStatus(INITIAL_STATUS);
        }

        return item;
    }
}| 項番 | 説明 |
|---|---|
(1) |
コンポーネントスキャンの対象とするため、 |
(2) |
入出力で使用するオブジェクトの型をそれぞれ型引数に指定した |
(3) |
定数として、ポイント加算対象とする商品購入フラグ:1を定義する。 |
(4) |
定数として、商品購入フラグの初期値:0を定義する。 |
(5) |
定数として、会員種別:G(ゴールド会員)を定義する。 |
(6) |
定数として、会員種別:N(一般会員)を定義する。 |
(7) |
定数として、ポイントの上限値:1000000を定義する。 |
(8) |
商品購入フラグおよび、会員種別に応じてポイント加算するビジネスロジックを実装する。 |
(9) |
返り値の型は、このクラスで実装している |
(10) |
引数として受け取る |
ジョブBean定義ファイルの設定
作成したビジネスロジックをジョブとして設定するため、ジョブBean定義ファイルに以下の(1)以降を追記する。
<?xml version="1.0" encoding="UTF-8"?>
<beans xmlns="http://www.springframework.org/schema/beans"
       xmlns:xsi="http://www.w3.org/2001/XMLSchema-instance"
       xmlns:context="http://www.springframework.org/schema/context"
       xmlns:batch="http://www.springframework.org/schema/batch"
       xmlns:p="http://www.springframework.org/schema/p"
       xmlns:mybatis="http://mybatis.org/schema/mybatis-spring"
       xsi:schemaLocation="http://www.springframework.org/schema/beans https://www.springframework.org/schema/beans/spring-beans.xsd
             http://www.springframework.org/schema/context https://www.springframework.org/schema/context/spring-context.xsd
             http://www.springframework.org/schema/batch https://www.springframework.org/schema/batch/spring-batch.xsd
             http://mybatis.org/schema/mybatis-spring http://mybatis.org/schema/mybatis-spring.xsd">

    <import resource="classpath:META-INF/spring/job-base-context.xml"/>

    <context:component-scan base-package="com.example.batch.tutorial.dbaccess.chunk"/>

    <mybatis:scan base-package="com.example.batch.tutorial.common.repository" factory-ref="jobSqlSessionFactory"/>

    <bean id="reader"
          class="org.mybatis.spring.batch.MyBatisCursorItemReader"
          p:queryId="com.example.batch.tutorial.common.repository.MemberInfoRepository.cursor"
          p:sqlSessionFactory-ref="jobSqlSessionFactory"/>

    <bean id="writer" class="org.mybatis.spring.batch.MyBatisBatchItemWriter"
          p:statementId="com.example.batch.tutorial.common.repository.MemberInfoRepository.updatePointAndStatus"
          p:sqlSessionTemplate-ref="batchModeSqlSessionTemplate"/>

    <!-- (1) -->
    <batch:job id="jobPointAddChunk" job-repository="jobRepository">
        <batch:step id="jobPointAddChunk.step01"> <!-- (2) -->
            <batch:tasklet transaction-manager="jobTransactionManager">
                <batch:chunk reader="reader"
                             processor="pointAddItemProcessor"
                             writer="writer" commit-interval="10"/> <!-- (3) -->
            </batch:tasklet>
        </batch:step>
    </batch:job>
</beans>| 項番 | 説明 |
|---|---|
(1) |
ジョブの設定を行う。 |
(2) |
ステップの設定を行う。 |
(3) |
チャンクモデルジョブの設定を行う。 |
|
commit-intervalのチューニング
commit-intervalはチャンクモデルジョブにおける、性能上のチューニングポイントである。 このチュートリアルでは10件としているが、利用できるマシンリソースやジョブの特性によって適切な件数は異なる。 複数のリソースにアクセスしてデータを加工するジョブであれば10件から100件程度で処理スループットが頭打ちになることもある。 一方、入出力リソースが1:1対応しておりデータを移し替える程度のジョブであれば5,000件や10,000件でも処理スループットが伸びることがある。 ジョブ実装時のcommit-intervalは100件程度で仮置きしておき、 その後に実施した性能測定の結果に応じてジョブごとにチューニングするとよい。 |
ジョブの実行と結果の確認
作成したジョブをSTS上で実行し、結果を確認する。
実行構成からジョブを実行
以下のとおり実行構成を作成し、ジョブを実行する。
実行構成の作成手順はプロジェクトの動作確認を参照。
- 実行構成の設定値
-
-
Name: 任意の名称(例: Run DBAccessJob for ChunkModel)
-
Mainタブ
-
Project:
macchinetta-batch-tutorial -
Main class:
org.springframework.batch.core.launch.support.CommandLineJobRunner
-
-
Argumentsタブ
-
Program arguments:
META-INF/jobs/dbaccess/jobPointAddChunk.xml jobPointAddChunk
-
-
コンソールログの確認
Console Viewを開き、以下の内容のログが出力されていることを確認する。
-
処理が完了(COMPLETED)し、例外が発生していないこと。
(.. omitted)

[2020/03/10 13:07:50] [main] [o.s.b.c.l.s.SimpleJobLauncher] [INFO ] Job: [FlowJob: [name=jobPointAddChunk]] launched with the following parameters: [{jsr_batch_run_id=112}]
[2020/03/10 13:07:50] [main] [o.s.b.c.j.SimpleStepHandler] [INFO ] Executing step: [jobPointAddChunk.step01]
[2020/03/10 13:07:50] [main] [o.s.b.c.s.AbstractStep] [INFO ] Step: [jobPointAddChunk.step01] executed in 173ms
[2020/03/10 13:07:50] [main] [o.s.b.c.l.s.SimpleJobLauncher] [INFO ] Job: [FlowJob: [name=jobPointAddChunk]] completed with the following parameters: [{jsr_batch_run_id=112}] and the following status: [COMPLETED] in 330ms
終了コードの確認
終了コードにより、正常終了したことを確認する。
確認手順はジョブの実行と結果の確認を参照。
終了コード(exit value)が0(正常終了)となっていることを確認する。

会員情報テーブルの確認
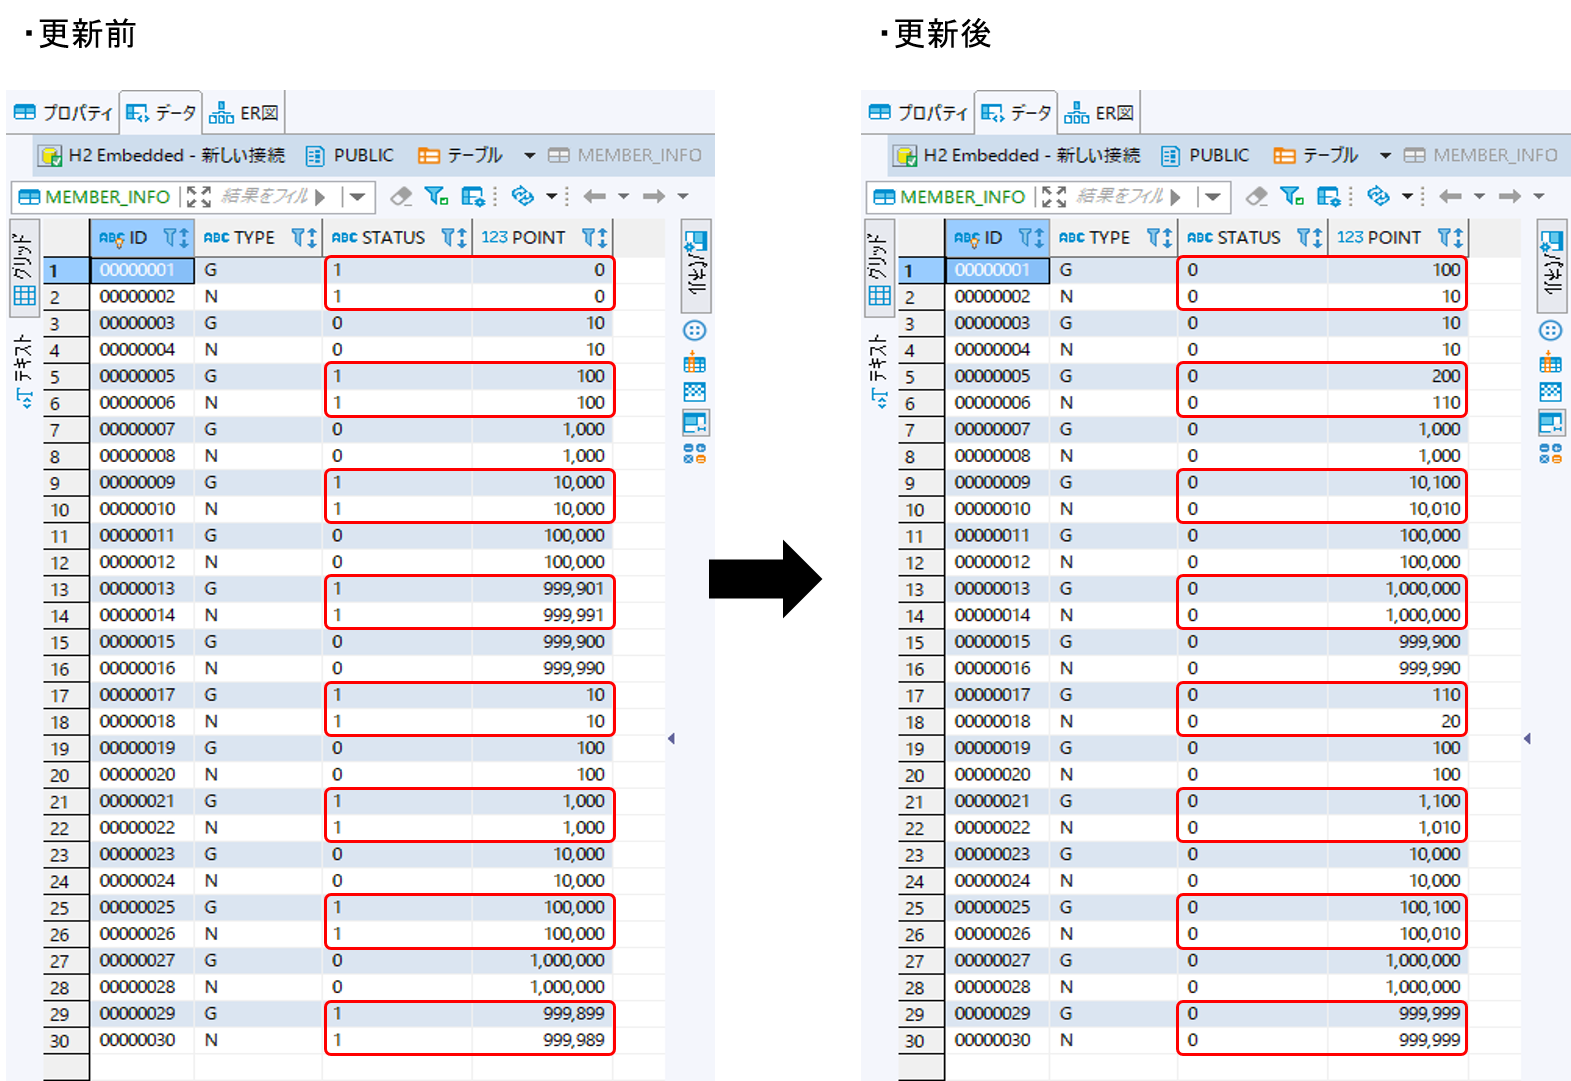
更新前後の会員情報テーブルの内容を比較し、確認内容のとおりとなっていることを確認する。
確認手順はDBeaverを使用してデータベースを参照するを参照。
- 確認内容
-
-
statusカラム
-
"1"(処理対象)から"0"(初期状態)に更新されていること
-
-
pointカラム
-
ポイント加算対象について、会員種別に応じたポイントが加算されていること
-
typeカラムが"G"(ゴールド会員)の場合は100ポイント
-
typeカラムが"N"(一般会員)の場合は10ポイント
-
-
1,000,000(上限値)を超えたレコードが存在しないこと
-
-
更新前後の会員情報テーブルの内容は以下のとおり。

タスクレットモデルでの実装
タスクレットモデルでデータベースアクセスするジョブの作成から実行までを以下の手順で実施する。
ジョブBean定義ファイルの作成
Bean定義ファイルにて、タスクレットモデルでデータベースアクセスを行うジョブを構成する要素の組み合わせ方を設定する。
ここでは、Bean定義ファイルの枠および共通的な設定のみ記述し、以降の項で各構成要素の設定を行う。
<?xml version="1.0" encoding="UTF-8"?>
<beans xmlns="http://www.springframework.org/schema/beans"
       xmlns:xsi="http://www.w3.org/2001/XMLSchema-instance"
       xmlns:context="http://www.springframework.org/schema/context"
       xmlns:batch="http://www.springframework.org/schema/batch"
       xmlns:p="http://www.springframework.org/schema/p"
       xmlns:mybatis="http://mybatis.org/schema/mybatis-spring"
       xsi:schemaLocation="http://www.springframework.org/schema/beans https://www.springframework.org/schema/beans/spring-beans.xsd
             http://www.springframework.org/schema/context https://www.springframework.org/schema/context/spring-context.xsd
             http://www.springframework.org/schema/batch https://www.springframework.org/schema/batch/spring-batch.xsd
             http://mybatis.org/schema/mybatis-spring http://mybatis.org/schema/mybatis-spring.xsd">

    <!-- (1) -->
    <import resource="classpath:META-INF/spring/job-base-context.xml"/>

    <!-- (2) -->
    <context:component-scan base-package="com.example.batch.tutorial.dbaccess.tasklet"/>

</beans>| 項番 | 説明 |
|---|---|
(1) |
Macchinetta Batch 2.xを利用する際に、常に必要なBean定義を読み込む設定をインポートする。 |
(2) |
コンポーネントスキャンの設定を行う。 |
DTOの実装
業務データを保持するためのクラスとしてDTOクラスを作成する。
DTOクラスはテーブルごとに作成する。
チャンクモデル/タスクレットモデルで共通して利用するため、既に作成している場合は読み飛ばしてよい。
package com.example.batch.tutorial.common.dto;

public class MemberInfoDto {
    private String id; // (1)

    private String type; // (2)

    private String status; // (3)

    private int point; // (4)

    public String getId() {
        return id;
    }

    public void setId(String id) {
        this.id = id;
    }

    public String getType() {
        return type;
    }

    public void setType(String type) {
        this.type = type;
    }

    public String getStatus() {
        return status;
    }

    public void setStatus(String status) {
        this.status = status;
    }

    public int getPoint() {
        return point;
    }

    public void setPoint(int point) {
        this.point = point;
    }
}| 項番 | 説明 |
|---|---|
(1) |
会員番号に対応するフィールドとして |
(2) |
会員種別に対応するフィールドとして |
(3) |
商品購入フラグに対応するフィールドとして |
(4) |
ポイントに対応するフィールドとして |
MyBatisによるデータベースアクセスの定義
MyBatisを利用してデータベースアクセスするための実装・設定を行う。
以下の作業を実施する。
チャンクモデル/タスクレットモデルで共通して利用するため、既に作成している場合は読み飛ばしてよい。
Repositoryインタフェースの実装
MapperXMLファイルに定義したSQLを呼び出すためのインタフェースを作成する。
このインタフェースに対する実装クラスは、MyBatisが自動で生成するため、開発者はインタフェースのみ作成すればよい。
package com.example.batch.tutorial.common.repository;

import com.example.batch.tutorial.common.dto.MemberInfoDto;
import org.apache.ibatis.cursor.Cursor;

public interface MemberInfoRepository {
    Cursor<MemberInfoDto> cursor(); // (1)

    int updatePointAndStatus(MemberInfoDto memberInfo); // (2)
}| 項番 | 説明 |
|---|---|
(1) |
MapperXMLファイルに定義するSQLのIDに対応するメソッドを定義する。 |
(2) |
ここでは、member_infoテーブルのpointカラムとstatusカラムを更新するためのメソッドを定義する。 |
MapperXMLファイルの作成
SQLとO/Rマッピングの設定を記載するMapperXMLファイルを作成する。
MapperXMLファイルは、Repositoryインタフェースごとに作成する。
MyBatisが定めたルールに則ったディレクトリに格納することで、自動的にMapperXMLファイルを読み込むことができる。 MapperXMLファイルを自動的に読み込ませるために、Repositoryインタフェースのパッケージ階層と同じ階層のディレクトリにMapperXMLファイルを格納する。
<?xml version="1.0" encoding="UTF-8"?>
<!DOCTYPE mapper PUBLIC "-//mybatis.org//DTD Mapper 3.0//EN"
        "http://mybatis.org/dtd/mybatis-3-mapper.dtd">

<!-- (1) -->
<mapper namespace="com.example.batch.tutorial.common.repository.MemberInfoRepository">

    <!-- (2) -->
    <select id="cursor" resultType="com.example.batch.tutorial.common.dto.MemberInfoDto">
        SELECT
            id,
            type,
            status,
            point
        FROM
            member_info
        ORDER BY
            id ASC
    </select>

    <!-- (3) -->
    <update id="updatePointAndStatus" parameterType="com.example.batch.tutorial.common.dto.MemberInfoDto">
        UPDATE
            member_info
        SET
            status = #{status},
            point = #{point}
        WHERE
            id = #{id}
    </update>
</mapper>| 項番 | 説明 |
|---|---|
(1) |
|
(2) |
参照系のSQLの定義を行う。 |
(3) |
更新系のSQLの定義を行う。 |
ジョブBean定義ファイルの設定
MyBatisによるデータベースアクセスするための設定として、ジョブBean定義ファイルに以下の(1)~(3)を追記する。
<?xml version="1.0" encoding="UTF-8"?>
<beans xmlns="http://www.springframework.org/schema/beans"
       xmlns:xsi="http://www.w3.org/2001/XMLSchema-instance"
       xmlns:context="http://www.springframework.org/schema/context"
       xmlns:batch="http://www.springframework.org/schema/batch"
       xmlns:p="http://www.springframework.org/schema/p"
       xmlns:mybatis="http://mybatis.org/schema/mybatis-spring"
       xsi:schemaLocation="http://www.springframework.org/schema/beans https://www.springframework.org/schema/beans/spring-beans.xsd
             http://www.springframework.org/schema/context https://www.springframework.org/schema/context/spring-context.xsd
             http://www.springframework.org/schema/batch https://www.springframework.org/schema/batch/spring-batch.xsd
             http://mybatis.org/schema/mybatis-spring http://mybatis.org/schema/mybatis-spring.xsd">

    <import resource="classpath:META-INF/spring/job-base-context.xml"/>

    <context:component-scan base-package="com.example.batch.tutorial.dbaccess.tasklet"/>

    <!-- (1) -->
    <mybatis:scan base-package="com.example.batch.tutorial.common.repository" factory-ref="jobSqlSessionFactory"/>

    <!-- (2) -->
    <bean id="reader"
          class="org.mybatis.spring.batch.MyBatisCursorItemReader"
          p:queryId="com.example.batch.tutorial.common.repository.MemberInfoRepository.cursor"
          p:sqlSessionFactory-ref="jobSqlSessionFactory"/>

    <!-- (3) -->
    <bean id="writer" class="org.mybatis.spring.batch.MyBatisBatchItemWriter"
          p:statementId="com.example.batch.tutorial.common.repository.MemberInfoRepository.updatePointAndStatus"
          p:sqlSessionTemplate-ref="batchModeSqlSessionTemplate"/>

</beans>| 項番 | 説明 |
|---|---|
(1) |
Repositoryインタフェースをスキャンするための設定を行う。 |
(2) |
ItemReaderの設定を行う。 |
(3) |
ItemWriterの設定を行う。 |
|
チャンクモデルのコンポーネントを利用するTasklet実装
このチュートリアルでは、タスクレットモデルでデータベースアクセスするジョブの作成を容易に実現するために、 チャンクモデルのコンポーネントであるItemReader・ItemWriterを利用している。 Tasklet実装の中でチャンクモデルの各種コンポーネントを利用するかどうかは、 チャンクモデルのコンポーネントを利用するTasklet実装を参照して適宜判断してほしい。 |
|
ItemReader・ItemWriter以外のデータベースアクセス
ItemReader・ItemWriter以外でデータベースアクセスする方法として、Mapperインタフェースを利用する方法がある。 Mapperインタフェースを利用するにあたっては、Macchinetta Batch 2.xとして制約を設けているため、 Mapperインタフェース(入力)、Mapperインタフェース(出力)を参照してほしい。 Taskletの実装例は、タスクレットモデルにおける利用方法(入力)、 タスクレットモデルにおける利用方法(出力)を参照。 |
ロジックの実装
ポイント加算処理を行うビジネスロジッククラスを実装する。
以下の作業を実施する。
PointAddTaskletクラスの実装
Taskletインタフェースを実装したPointAddTaskletクラスを実装する。
package com.example.batch.tutorial.dbaccess.tasklet;

import org.springframework.batch.core.StepContribution;
import org.springframework.batch.core.scope.context.ChunkContext;
import org.springframework.batch.core.step.tasklet.Tasklet;
import org.springframework.batch.item.ItemStreamReader;
import org.springframework.batch.item.ItemWriter;
import org.springframework.batch.repeat.RepeatStatus;
import org.springframework.stereotype.Component;
import com.example.batch.tutorial.common.dto.MemberInfoDto;

import javax.inject.Inject;
import java.util.ArrayList;
import java.util.List;

@Component // (1)
public class PointAddTasklet implements Tasklet {

    private static final String TARGET_STATUS = "1"; // (2)

    private static final String INITIAL_STATUS = "0"; // (3)

    private static final String GOLD_MEMBER = "G"; // (4)

    private static final String NORMAL_MEMBER = "N"; // (5)

    private static final int MAX_POINT = 1000000; // (6)

    private static final int CHUNK_SIZE = 10; // (7)

    @Inject // (8)
    ItemStreamReader<MemberInfoDto> reader; // (9)

    @Inject // (8)
    ItemWriter<MemberInfoDto> writer; // (10)

    @Override
    public RepeatStatus execute(StepContribution contribution, ChunkContext chunkContext) throws Exception { // (11)
        MemberInfoDto item = null;

        List<MemberInfoDto> items = new ArrayList<>(CHUNK_SIZE); // (12)

        try {
            reader.open(chunkContext.getStepContext().getStepExecution().getExecutionContext()); // (13)

            while ((item = reader.read()) != null) { // (14)

                if (TARGET_STATUS.equals(item.getStatus())) {
                    if (GOLD_MEMBER.equals(item.getType())) {
                        item.setPoint(item.getPoint() + 100);
                    } else if (NORMAL_MEMBER.equals(item.getType())) {
                        item.setPoint(item.getPoint() + 10);
                    }

                    if (item.getPoint() > MAX_POINT) {
                        item.setPoint(MAX_POINT);
                    }

                    item.setStatus(INITIAL_STATUS);
                }

                items.add(item);

                if (items.size() == CHUNK_SIZE) { // (15)
                    writer.write(items); // (16)
                    items.clear();
                }
            }

            writer.write(items); // (17)
        } finally {
            reader.close(); // (18)
        }

        return RepeatStatus.FINISHED; // (19)
    }
}| 項番 | 説明 |
|---|---|
(1) |
コンポーネントスキャンの対象とするため、 |
(2) |
定数として、ポイント加算対象とする商品購入フラグ:1を定義する。 |
(3) |
定数として、商品購入フラグの初期値:0を定義する。 |
(4) |
定数として、会員種別:G(ゴールド会員)を定義する。 |
(5) |
定数として、会員種別:N(一般会員)を定義する。 |
(6) |
定数として、ポイントの上限値:1000000を定義する。 |
(7) |
定数として、まとめて処理する単位(一定件数):10を定義する。 |
(8) |
|
(9) |
データベースアクセスするために |
(10) |
|
(11) |
商品購入フラグおよび、会員種別に応じてポイント加算するビジネスロジックを実装する。 |
(12) |
一定件数分の |
(13) |
入力リソースをオープンする。 |
(14) |
入力リソース全件を逐次ループ処理する。 |
(15) |
リストに追加した |
(16) |
データベースへ出力する。 |
(17) |
全体の処理件数/一定件数の余り分をデータベースへ出力する。 |
(18) |
リソースをクローズする。 |
(19) |
Taskletの処理が完了したかどうかを返却する。 |
ジョブBean定義ファイルの設定
作成したビジネスロジックをジョブとして設定するため、ジョブBean定義ファイルに以下の(1)以降を追記する。
<?xml version="1.0" encoding="UTF-8"?>
<beans xmlns="http://www.springframework.org/schema/beans"
       xmlns:xsi="http://www.w3.org/2001/XMLSchema-instance"
       xmlns:context="http://www.springframework.org/schema/context"
       xmlns:batch="http://www.springframework.org/schema/batch"
       xmlns:p="http://www.springframework.org/schema/p"
       xmlns:mybatis="http://mybatis.org/schema/mybatis-spring"
       xsi:schemaLocation="http://www.springframework.org/schema/beans https://www.springframework.org/schema/beans/spring-beans.xsd
             http://www.springframework.org/schema/context https://www.springframework.org/schema/context/spring-context.xsd
             http://www.springframework.org/schema/batch https://www.springframework.org/schema/batch/spring-batch.xsd
             http://mybatis.org/schema/mybatis-spring http://mybatis.org/schema/mybatis-spring.xsd">

    <import resource="classpath:META-INF/spring/job-base-context.xml"/>

    <context:component-scan base-package="com.example.batch.tutorial.dbaccess.tasklet"/>

    <mybatis:scan base-package="com.example.batch.tutorial.common.repository" factory-ref="jobSqlSessionFactory"/>

    <bean id="reader"
          class="org.mybatis.spring.batch.MyBatisCursorItemReader"
          p:queryId="com.example.batch.tutorial.common.repository.MemberInfoRepository.cursor"
          p:sqlSessionFactory-ref="jobSqlSessionFactory"/>

    <bean id="writer" class="org.mybatis.spring.batch.MyBatisBatchItemWriter"
          p:statementId="com.example.batch.tutorial.common.repository.MemberInfoRepository.updatePointAndStatus"
         p:sqlSessionTemplate-ref="batchModeSqlSessionTemplate"/>

    <!-- (1) -->
    <batch:job id="jobPointAddTasklet" job-repository="jobRepository">
        <batch:step id="jobPointAddTasklet.step01"> <!-- (2) -->
            <batch:tasklet transaction-manager="jobTransactionManager"
                           ref="pointAddTasklet"/> <!-- (3) -->
        </batch:step>
    </batch:job>
</beans>| 項番 | 説明 |
|---|---|
(1) |
ジョブの設定を行う。 |
(2) |
ステップの設定を行う。 |
(3) |
タスクレットの設定を行う。 |
ジョブの実行と結果の確認
作成したジョブをSTS上で実行し、結果を確認する。
実行構成からジョブを実行
以下のとおり実行構成を作成し、ジョブを実行する。
実行構成の作成手順はプロジェクトの動作確認を参照。
- 実行構成の設定値
-
-
Name: 任意の名称(例: Run DBAccessJob for TaskletModel)
-
Mainタブ
-
Project:
macchinetta-batch-tutorial -
Main class:
org.springframework.batch.core.launch.support.CommandLineJobRunner
-
-
Argumentsタブ
-
Program arguments:
META-INF/jobs/dbaccess/jobPointAddTasklet.xml jobPointAddTasklet
-
-
コンソールログの確認
Console Viewを開き、以下の内容のログが出力されていることを確認する。
-
処理が完了(COMPLETED)し、例外が発生していないこと。
(.. omitted)

[2020/03/10 13:10:12] [main] [o.s.b.c.l.s.SimpleJobLauncher] [INFO ] Job: [FlowJob: [name=jobPointAddTasklet]] launched with the following parameters: [{jsr_batch_run_id=114}]
[2020/03/10 13:10:12] [main] [o.s.b.c.j.SimpleStepHandler] [INFO ] Executing step: [jobPointAddTasklet.step01]
[2020/03/10 13:10:12] [main] [o.s.b.c.s.AbstractStep] [INFO ] Step: [jobPointAddTasklet.step01] executed in 94ms
[2020/03/10 13:10:12] [main] [o.s.b.c.l.s.SimpleJobLauncher] [INFO ] Job: [FlowJob: [name=jobPointAddTasklet]] completed with the following parameters: [{jsr_batch_run_id=114}] and the following status: [COMPLETED] in 168ms
終了コードの確認
終了コードにより、正常終了したことを確認する。
確認手順はジョブの実行と結果の確認を参照。
終了コード(exit value)が0(正常終了)となっていることを確認する。

会員情報テーブルの確認
更新前後の会員情報テーブルの内容を比較し、確認内容のとおりとなっていることを確認する。
確認手順はDBeaverを使用してデータベースを参照するを参照。
- 確認内容
-
-
statusカラム
-
"1"(処理対象)から"0"(初期状態)に更新されていること
-
-
pointカラム
-
ポイント加算対象について、会員種別に応じたポイントが加算されていること
-
typeカラムが"G"(ゴールド会員)の場合は100ポイント
-
typeカラムが"N"(一般会員)の場合は10ポイント
-
-
1,000,000(上限値)を超えたレコードが存在しないこと
-
-
更新前後の会員情報テーブルの内容は以下のとおり。
