3.8. 環境依存値の外部管理
目次
3.8.1. Overview
本ガイドラインでは、環境依存値の外部管理を行う方法について説明する。 同一アプリケーションを複数サーバで稼動するシステムでは、環境依存値を一元管理して、稼働環境毎(本番環境・ステージング環境・開発環境など)に接続情報などの切り替えを行う。 環境依存値の外部管理は、Spring Cloud Configの機能を利用して実現する。
3.8.1.1. 外部管理方式
クラウド環境に複数のアプリケーションを配置して環境依存値を共有する場合に、 アプリケーションはConfig Clientとして、Config Server側に設定値の問い合わせを行い起動時に利用する。環境毎の切り替えは、Spring Profileを使用してConfig Clientとなるアプリケーションを起動することで、Config ServerはSpring Profileに応じた環境設定値を返却する。
開発環境のアプリケーションと本番環境のアプリケーションが、それぞれの設定値をConfig Serverから取得するイメージを以下に示す。
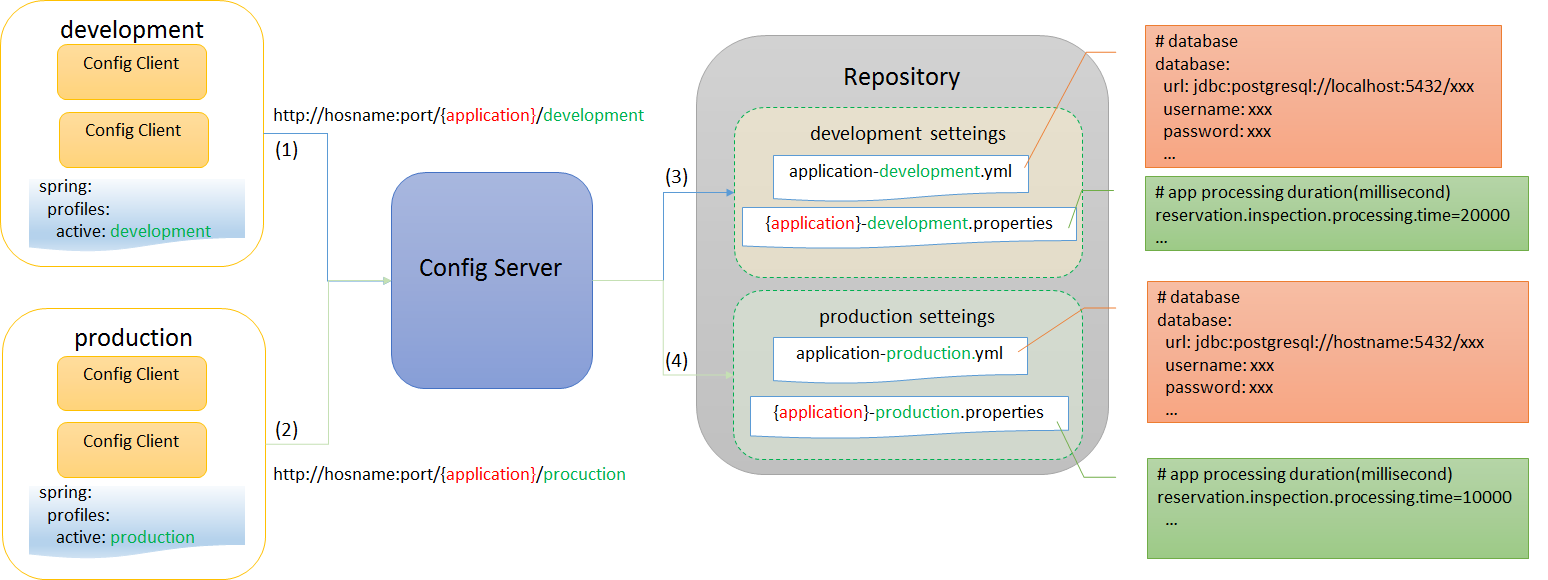
| 項番 | 説明 |
|---|---|
(1)
|
開発用アプリケーションは、Config Serverに設定値の問合せを行う。
開発用アプリケーションの
spring.profiles.activeには、開発用である事を示すプロファイル名(ここではdevelopment)が指定されている。 |
(2)
|
本番用アプリケーションは、Config Serverに設定値の問合せを行う。
本番用アプリケーションの
spring.profiles.activeには、本番用である事を示すプロファイル名(ここではproduction)が指定されている。 |
(3)
|
Config Serverは、環境リポジトリから開発環境向けの設定値を取得し、開発用アプリケーションに返却する。
環境リポジトリでは、プロファイル名を含んだ.ymlファイルと.propertiesファイルにて、プロファイルごとの設定値を管理している。
|
(4)
|
Config Serverは、環境リポジトリから本番環境向けの設定値を取得し、本番用アプリケーションに返却する。
|
Warning
Config Serverは、アプリケーションの環境設定値を保持しているため、SPOFにならないように注意が必要。 具体的な構成としては、手前にLoad Balancerなどを配備して、冗長化を行うなどの対策が必要。
Warning
Spring Cloud ConfigにはSnakeYAMLが依存関係に含まれているため、 SnakeYAMLのデフォルト設定に由来する脆弱性から、信頼されていない外部との通信しないように注意が必要。 具体的には、環境リポジトリを外部公開しない、通信制限を設けるなどの対策が必要。 YAMLに特別なステートメントが含まれている場合、デフォルトでクラスのインスタンス化が可能になるため、 YAMLファイルが信頼できないソースからロードされた場合、ホストアプリケーションの制御外でコードをロードして実行する可能性があり。
3.8.1.1.1. 設定ファイル分割方針
設定ファイルは、 フレームワーク の設定と アプリケーションの設定で2分割する。
- フレームワーク の設定は
application-{環境プロファイル名}.ymlに記載 - アプリケーション設定は
[ アプリケーション名]-{環境プロファイル名}.propertiesに記載
3.8.1.1.2. 一元管理設定項目方針
- フレームワーク の設定項目は、主に環境依存値となる接続情報やログ出力先などを管理
- アプリケーションの設定項目は、運用時に変更が必要な項目のみ管理
Note
運用時に変更が必要となる閾値などのチューニングパラメータ等を管理すること。
Warning
変更頻度の低いマスタデータなどは対象外とすること。
3.8.2. How to use
3.8.2.1. Config Serverの構築
Spring Frameworkから提供されている「Spring Cloud Config Server」機能を使用した、環境依存値の一元管理方法について説明する。 「Spring Cloud Config Server」の構築の詳細については、公式リファレンスの”Spring Cloud Config Server”を参照されたい。
pom.xmlで必要なjarを設定する。
pom.xml
<dependency>
    <groupId>org.springframework.cloud</groupId>
    <artifactId>spring-cloud-config-server</artifactId>
</dependency>
Spring Bootの起動クラスを作成する。
ConfigServer.java
@SpringBootApplication
@EnableConfigServer
public class ConfigServer {
    public static void main(String[] args) {
        SpringApplication.run(ConfigServer.class, args);
    }

}
上記のpom.xmlおよびSpring Bootの起動クラスは、Config Server用のプロジェクトに配置する。 Config Server用のプロジェクトを作成する方法ついては、Config Server用にプロジェクトの設定を変更するにて紹介している。併せて参照されたい。
3.8.2.2. アプリケーションの設定
3.8.2.2.1. Config Serverの設定
Spring Boot Applicatonで構築したConfig Serverに、以下の設定を行う。
application.yml
server:
  port: 8888 # (1)
spring:
  cloud:
    config:
      server:
        git: #(2)
          uri: http://xx.xx.xxx.xx/git/xxx/xxx.git #(3)
          username: xxxxxxxx #(4)
          password: xxxxxxxx #(5)
          clone-on-start: true #(6)
          searchPaths: xxx-env/configs/repository #(7)
項番 説明 server.portにサーバの起動ポートを設定する。spring.cloud.config.server.gitは、Spring Profileで変更可能な環境リポジトリを表す。Spring Profileに何も設定しないで起動した場合はgitが使用される。他には、nativeやsubversionが設定可能。spring.cloud.config.server.git.uriは、対象となる環境リポジトリのURIを設定する。spring.cloud.config.server.usernameは、環境リポジトリに対して認証が必要な場合にユーザを設定する。spring.cloud.config.server.passwordは、環境リポジトリに対して認証が必要な場合にパスワードを設定する。spring.cloud.config.server.clone-on-startは、環境リポジトリからのcloneのタイミングを設定する。trueを設定した場合はConfig Server起動時に、falseを設定した場合はアプリケーションからの初回Configuration要求時に、それぞれcloneが実行される。設定ミスなどによる環境リポジトリへのアクセスエラーを起動時に早期検出したい場合は、trueを設定するとよい。spring.cloud.config.server.searchPathsは、サブディレクトリに設定ファイルを格納した場合に、検索するパターンを設定する。
3.8.2.2.2. Config Clientの設定
Config Clientとなるアプリケーションに、以下の設定を行う。
bootstrap.yml
spring:
  cloud:
    config:
      uri: http://localhost:8888 #(1)
      fail-fast: false #(2)
      enabled: true #(3)
項番 説明 spring.cloud.config.urlにConfig ServerのURLを設定する。spring.cloud.config.fail-fastは、Config Serverに接続できない時に、起動させない場合はtrueを設定する。そうでない場合は、falseを設定する。spring.cloud.config.enabledは、Config Serverからの設定取得を無効にするにはfalseを設定する。デフォルト値がtrueの為、有効にする場合は設定する必要はない。Note
開発時など、Config Serverへの接続が不可能な状態の場合は、
spring.cloud.config.enabledにfalseを設定する、またはspring.cloud.config.fail-fastにtrueを設定することで、Config ClientとなるアプリケーションをConfig Serverなしで起動できる。
3.8.2.2.3. 環境依存値の利用方法
環境依存な値をConfig Serverより取得して、アプリケーションで利用する場合の方法を示す。 以下の例では、ファイルをアップロードするS3バケットを開発環境と本番環境で切り替えている。
application-development.yml
# upload directories
  upload:
    bucketName: xxx-upload-private-dev #(1)
    temporaryDirectory: tmp/
    saveDirectory: save/
application-production.yml
# upload directories
  upload:
    bucketName: xxx-upload-private-production #(2)
    temporaryDirectory: tmp/
    saveDirectory: save/
MemberRegisterServiceImpl.java
@Service
@Transactional
public class MemberRegisterServiceImpl implements MemberRegisterService {

    /**
     * S3バケット。
     */
    @Value("${upload.bucketName}")
    private String bucketName; // (3)

    ...

    @Override
    @Transactional
    public Member register(Member member) {
      ...

        // ファイル保存を行う。
        s3Helper.fileCopy(bucketName, tmpDirectory, member.getPhotoFileName(),
                bucketName, saveDirectory, member.getCustomerNo() + "_" + UUID
                        .randomUUID().toString() + ".jpg"); // (4)

        ...

        return member;
    }
}
項番 説明 application-development.ymlに開発用のファイルアップロードバケットを設定する。application-production.ymlに本番用のファイルアップロードバケットを設定する。spring.profiles.active)に応じたupload.bucketNameを取得する。bucketNameを使用してファイル保存を実施する。Note
環境毎の設定ファイルは、Spring Profileを使用した制御を行う為、Config Clientとなるアプリケーションを配備するサーバの起動パラメータで
-Dspring.profiles.active=developmentの様に、アクティブなプロファイルを指定する必要がある。
3.8.2.2.4. プロファイルによるログ設定の切り替え方法
Spring Bootが提供するLogback統合の仕組みにより、Config Serverの設定値をLogbackに反映することが可能である。
本ガイドラインでは、Spring Profileにより、環境ごとにLogback設定の切り替えを行う方法を説明する。 これによりLogbackの設定の一部を環境に応じて切り替えることが可能となる。
Logback設定ファイルの記述例を以下に示す。
logback-spring.xml
<configuration>
   ...
   <springProfile name="production">  <!-- (1) -->
      <root>
          <level value="warn" />
          <appender-ref ref="APPLICATION_LOG_FILE" />
      </root>
   </springProfile>

   <springProfile name="default, local, development, ci">
     <root>
         <level value="info" />
         <appender-ref ref="STDOUT" />
         <appender-ref ref="APPLICATION_LOG_FILE" />
     </root>
   </springProfile>
</configuration>
項番 説明 springProfile要素で、環境単位で定義を変更したい箇所を囲むことで、プロファイル単位の設定をすることができる。name属性は、対象となるプロファイル名を指定する。
また、以下の様に、includeを使用してファイル全体を切り替えることも可能である。
logback-spring.xml
<configuration>
   <springProfile name="development">
      <include resource="logback-development-logger.xml"/>
   </springProfile>

   <springProfile name="production">
      <include resource="logback-production-logger.xml"/>
   </springProfile>
</configuration>
3.8.3. How to extend
3.8.3.1. 設定のリフレッシュ機能
アプリケーション起動中に、Config Serverの設定変更を反映させるrefreshエンドポイントを利用することで実現する。 変更のタイミングでPOSTアクセスを行うことで変更が反映される。
- リフレッシュ対象は以下
@ConfigurationPropertiesアノテーションが付与されているクラス@RefreshScopeアノテーションが付与されているBean- Log Level (Spring の設定を使用している場合のみ)
Warning
Config ClientとなるアプリケーションをSpring Bootに内包されたTomcatではなく、外部のTomcatにデプロイした場合は、リフレッシュ機能は無効となる。 また、DIコンテナの再起動が発生するリスタート機能も同様に無効となる。
3.8.3.2. クラウドベンダ連携
Spring Cloud Config Serverの環境リポジトリに、クラウドベンダのクラウドストレージを指定する場合の拡張方法を示す。 実装例として、環境リポジトリにAWSのS3を利用する場合の拡張例を紹介する。
Note
Spring Cloud Config Serverは、Spring Profileを指定しないで起動した場合は、環境リポジトリにGitHubを利用する。
3.8.3.2.1. 環境リポジトリの登録
Spring Profileに応じた環境リポジトリの登録を行う。
CustomEnvironmentRepositoryConfiguration.java
@Configuration
@EnableConfigurationProperties(ConfigServerProperties.class)
public class CustomEnvironmentRepositoryConfiguration {

    @Configuration
    @Profile("s3") // (1)
    protected static class S3RepositoryConfiguration {

        @Inject
        private ConfigurableEnvironment environment;

        @Bean
        public EnvironmentRepository environmentRepository() {
            return new S3EnvironmentRepository(this.environment); // (2)
        }

    }
}
項番 説明 @Profileを付与して、Spring Profileが対象の環境リポジトリを表す識別子の場合に適用される様に設定する。サンプルでは、AWSのS3を対象している。
3.8.3.2.2. 環境リポジトリの実装
Spring Profileに応じた環境リポジトリの実装を行う。
S3EnvironmentRepository.java
@ConfigurationProperties("spring.cloud.config.server.s3") // (1)
public class S3EnvironmentRepository extends AbstractScmEnvironmentRepository
                                                                             implements
                                                                             EnvironmentRepository,
                                                                             SearchPathLocator,
                                                                             InitializingBean { // (2)

    private static Log logger = LogFactory
            .getLog(S3EnvironmentRepository.class);

    public S3EnvironmentRepository(ConfigurableEnvironment environment) {
        super(environment);
    }

    @Override
    public synchronized Locations getLocations(String application,
            String profile, String label) { // (3)

        AmazonS3 amazonS3 = AmazonS3ClientBuilder.defaultClient();
        TransferManager tm = null;
        try {
            String bucketName = new AmazonS3URI(getUri()).getBucket();
            tm = TransferManagerBuilder.standard().withS3Client(amazonS3)
                 .build();
            logger.info("local temp dir:" + getBasedir().getAbsolutePath());
            MultipleFileDownload download = tm.downloadDirectory(bucketName,
                    null, getBasedir());
            download.waitForCompletion();
        } catch (InterruptedException e) {
            Thread.currentThread().interrupt();
        } catch (Throwable t) {
            throw new IllegalStateException("Cannot download s3", t);
        } finally {
            if (tm != null) {
                tm.shutdownNow();
            }

        }

        return new Locations(application, profile, label, null, getSearchLocations(
                getWorkingDirectory(), application, profile, label));
    }

    @Override
    public void afterPropertiesSet() { // (4)
        Assert.state(getUri() != null,
                "You need to configure a uri for the s3 bucket (e.g. 's3://bucket/')");
        // S3 URIを検証するためにインスタンス化
        new AmazonS3URI(getUri());
    }


}
項番 説明 @ConfigurationPropertiesを付与して、対応するプロパティ値の設定を行う。インジェクション対象はSearchPathLocator。AbstractScmEnvironmentRepositoryを継承して、SCM環境リポジトリのテンプレートパターンで拡張実装する。getLocationsメソッドは、対象となる環境リポジトリから、ファイルをダウンロードおよびチェックアウトして、ローカルの一時ディレクトリに保存して、ロケーションを返却する。InitializingBean#afterPropertiesSetを実装してチェックを実施する。
3.8.3.2.3. 拡張環境リポジトリの設定
拡張実装に応じた環境リポジトリ設定を行う。
application.yml
spring:
  cloud:
    config:
      server:
        s3: #(1)
          uri: s3://xxx.config.repo
          searchPaths: {application}
  profiles:
    active: s3 #(2)
cloud.aws: #(3)
  region:
    static: ap-northeast-1
    auto: false
項番 説明 spring.cloud.config.server.s3は使用する環境リポジトリを表す識別子を指定する。下位階層の設定はデフォルトで用意されている項目と同様の設定を行う。spring.profiles.activeにアプリケーション起動時に使用するプロファイルを指定する。cloud.awsは、拡張実装した環境リポジトリ固有の設定を行っている。サンプルはAWS S3を使用しているためAWSの設定を行っている。
3.8.4. Appendix
3.8.4.1. Config Server用にプロジェクトの設定を変更する
artifactId
├── pom.xml
├── artifactId-domain
├── artifactId-env
├── artifactId-initdb
├── artifactId-selenium
└── artifactId-web
以下のようなプロジェクト構成にする。
artifactId
├── pom.xml
├── artifactId-domain
├── artifactId-env
├── artifactId-initdb
├── artifactId-selenium
├── artifactId-web
└── artifactId-config
3.8.4.2. configプロジェクトの作成
configプロジェクトの構成について説明する。 Spring Bootプロジェクトについては、公式リファレンスの”Using Spring Boot”を参照されたい。
artifactId-config
    ├── pom.xml  ... (1)
項番
|
説明
|
|---|---|
(1)
|
configモジュールの構成を定義するPOM(Project Object Model)ファイル。 このファイルでは、以下の定義を行う。
|
<project xmlns="http://maven.apache.org/POM/4.0.0" xmlns:xsi="http://www.w3.org/2001/XMLSchema-instance"
    xsi:schemaLocation="http://maven.apache.org/POM/4.0.0 http://maven.apache.org/xsd/maven-4.0.0.xsd">
    <!-- (1) -->
    <modelVersion>4.0.0</modelVersion>
    <artifactId>artifactId-config</artifactId>
    <name>${project.artifactId}</name>
    <packaging>jar</packaging>
    <parent>
        <groupId>groupId</groupId>
        <artifactId>artifactId-parent</artifactId>
        <version>1.0.0-SNAPSHOT</version>
        <relativePath>../pom.xml</relativePath>
    </parent>
    <!-- (2) -->
    <build>
        <plugins>
            <plugin>
                <groupId>org.springframework.boot</groupId>
                <artifactId>spring-boot-maven-plugin</artifactId>
                <executions>
                    <execution>
                        <goals>
                            <goal>repackage</goal>
                        </goals>
                    </execution>
                </executions>
                <configuration>
                    <!-- Configurations for local PC -->
                    <jvmArguments>
                        ${jvmargs.profiles}
                        ${jvmargs.location}
                        ${jvmargs.region}
                        ${jvmargs.region.auto}
                    </jvmArguments>
                </configuration>
            </plugin>
        </plugins>
    </build>
    <!-- (3) -->
    <dependencies>
        <dependency>
            <groupId>org.springframework.cloud</groupId>
            <artifactId>spring-cloud-config-server</artifactId>
        </dependency>
        <dependency>
            <groupId>org.springframework.boot</groupId>
            <artifactId>spring-boot-starter-actuator</artifactId>
        </dependency>
        <dependency>
            <groupId>org.springframework.boot</groupId>
            <artifactId>spring-boot-starter</artifactId>
        </dependency>
        <dependency>
            <groupId>org.springframework.cloud</groupId>
            <artifactId>spring-cloud-starter-aws</artifactId>
        </dependency>
        <dependency>
            <groupId>org.springframework.boot</groupId>
            <artifactId>spring-boot-configuration-processor</artifactId>
            <optional>true</optional>
        </dependency>
        <dependency>
            <groupId>javax.inject</groupId>
            <artifactId>javax.inject</artifactId>
        </dependency>
        <dependency>
            <groupId>${project.groupId}</groupId>
            <artifactId>xxx-common</artifactId>
        </dependency>
    </dependencies>
    <!-- (4) -->
    <profiles>
        <profile>
            <id>s3-default</id>
            <activation>
                <activeByDefault>true</activeByDefault> <!-- (5) -->
            </activation>
            <!-- (6) -->
            <properties>
                <jvmargs.profiles></jvmargs.profiles>
                <jvmargs.location>-Dspring.cloud.config.server.s3.uri=s3://xxx.config.repo</jvmargs.location>
                <jvmargs.region>-Dcloud.aws.region.static=ap-northeast-1</jvmargs.region>
                <jvmargs.region.auto>-Dcloud.aws.region.auto=false</jvmargs.region.auto>
            </properties>
        </profile>
        <profile>
            <id>native</id>
            <properties>
                <jvmargs.profiles>-Dspring.profiles.active=native</jvmargs.profiles>
                <jvmargs.location>-Dspring.cloud.config.server.native.searchLocations=file:${project.parent.basedir}/xxx-env/configs/repository/{application},file:${project.parent.basedir}/xxx-back/xxx-back-env/configs/repository/{application}</jvmargs.location>
                <jvmargs.region>-Dcloud.aws.region.static=ap-northeast-1</jvmargs.region>
                <jvmargs.region.auto>-Dcloud.aws.region.auto=false</jvmargs.region.auto>
            </properties>
        </profile>
    </profiles>

    <properties>
        <project.root.basedir>${project.parent.basedir}</project.root.basedir>
    </properties>

</project>
| 項番 | 説明 |
|---|---|
(1)
|
プロジェクトに関する情報を記述する。
なお、
artifactId-configのartifactId、artifactId-parentのartifactId、groupIdは、ブランクプロジェクト作成時に指定した値を使用する。 |
(2)
|
ビルド時に使用するプラグインを記述する。
|
(3)
|
プロジェクトで使用するライブラリを、依存ライブラリとして記述する。
|
(4)
|
Mavenプロファイルによる設定値切り替えを行う。
|
(5)
|
<activeByDefault>にtrueを設定する事で、s3-defaultがデフォルトのMavenプロファイルとして動作する。 |
(6)
|
このMavenプロファイルが有効になった場合に使用されるプロパティ設定を記述する。
ここでは、AWSのS3を環境リポジトリとして使用した場合のプロパティ設定例を記載している。
|