11.3. セッションチュートリアル
目次
11.3.1. 始めに
11.3.1.1. 学習の流れ
このチュートリアルでは、簡易webアプリケーションの作成を通じてセッション管理対象となるデータの設計方法やセッションを利用するための具体的な実装方法を学習する。 本チュートリアルは以下の流れで実施する。
- 作成するwebアプリケーションの要件を確認する
- 要件を満たすようなControllerの実装方法とデータの設計を行う手順を確認する
- 設計情報をもとに実装する
11.3.1.2. このチュートリアルで学ぶこと
- セッション管理対象となるデータの設計方法
- セッションに格納するデータの選択
- セッション中のデータの破棄
- 本FWにおけるセッションの具体的な利用方法
@SessionAttributesを使用する方法- セッションスコープのBeanを使用する方法
11.3.1.3. 対象読者
- チュートリアル:Todoアプリケーションを実施している
- チュートリアル:Spring Securityを実施している
11.3.1.4. 検証環境
本チュートリアルは以下の環境で動作確認している。
| 種別 | プロダクト |
|---|---|
| OS | Windows 10 |
| JVM | Java 1.8 |
| IDE | Spring Tool Suite 3.9.12.RELEASE (以降「STS」と呼ぶ) |
| Build Tool | Apache Maven 3.3.9 (以降「Maven」と呼ぶ) |
| Application Server | Pivotal tc Server Developer Edition v4.0 (STSに同封) |
| Web Browser | Google Chrome 88.0.4324.182 |
Warning
本ガイドラインではSTS 4.xではなく、3.xを利用している。詳細は STS 4.x について を参照されたい。
11.3.2. アプリケーションの概要と要件
11.3.2.1. 概要
簡易ECサイトを作成する。 ECサイトにおいて、ユーザは以下が行える。
- アカウントでログインできる
- アカウントを作成する
- 作成したアカウント情報を変更する
- ECサイトで扱っている商品一覧を見る
- 商品の詳細を見る
- 購入したい商品をカートに登録する
- カートに登録した商品をカートから削除する
- カート内の商品を注文する
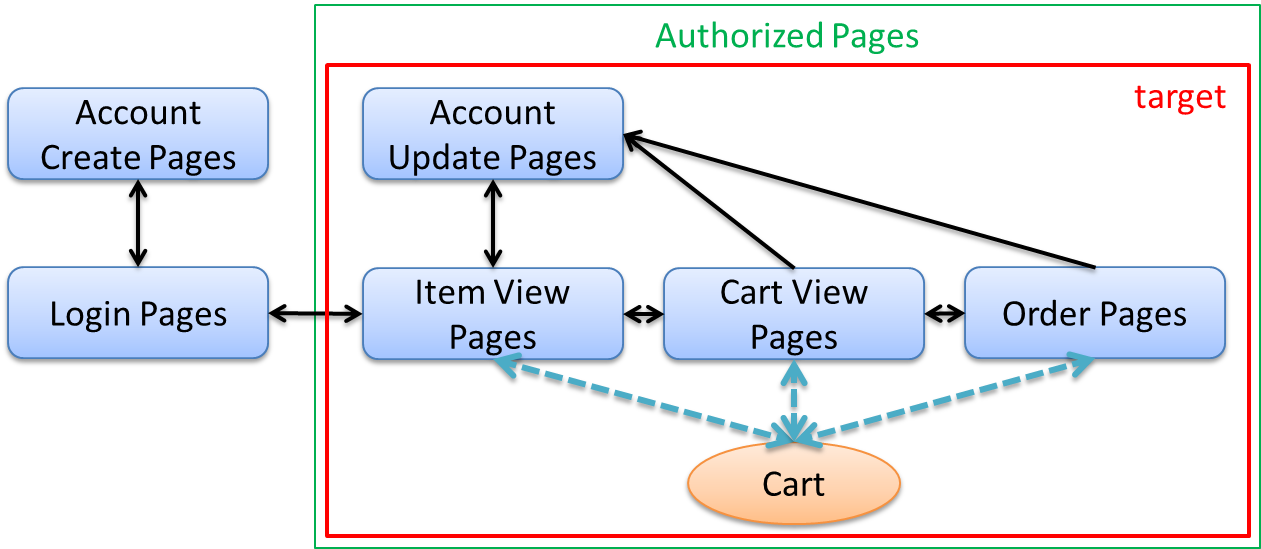
アプリケーションの概要を以下の図に示す。図中のXxxPagesは画面群を表している。 本チュートリアルでは、1つの画面群で行われるシステムとユーザとのやり取りを1つのユースケースとして扱う。
11.3.2.2. 要件
11.3.2.2.1. 機能要件
本アプリケーションでは、前述の各画面(ユースケース)に対して以下の機能を実装する。
画面(ユースケース) 機能
本チュートリアルの初期資材として提供されるプロジェクトでは、あらかじめ一部の機能が作成されている。 これは、セッション管理に直接関連しない部分を作成するコストを削減することを目的としている。
本チュートリアルでは、未完成の機能を作成する。 また、未完成の機能においても、ドメイン層・インフラストラクチャ層の実装は作成済みである。 したがって、本チュートリアルでは、未完成機能の画面とアプリケーション層の作成を行う。
11.3.2.2.2. 非機能要件
実際のアプリケーションを作成する際には、そのシステムに求められている非機能要件を考慮して設計、実装する必要がある。 本チュートリアルでは以下のような非機能要件があることを仮定して設計・作成を行う。 以下で示されている各要件の具体的な数値は学習のための仮想的な値である。 本チュートリアルで作成したアプリケーションが実際に要件を満たすことを保証できないので注意されたい。
可用性
- 運用期間:24時間
- 年に数日の計画停止日あり
- 1時間ほどの停止は許容
- 障害復帰は1営業日以内を目標とする
- 稼働率:99%
使用性
- 複数ブラウザ及びタブ上での動作保証はしない
性能
- ユーザ数:10,000人
- 同時アクセス数:200人
- オンライン処理件数:10,000件 / 月
- ユーザ数・同時アクセス数・オンライン処理件数ともに1年で1.2倍の増大が見込まれる
セッション管理の設計をするうえで、以下の項目を検討する際に上記要件を考慮する必要がある。
要件 検討項目
- 複数サーバ運用におけるレプリケーションの有無
- データの整合性の保持
- 複数サーバ運用におけるレプリケーションの有無
- メモリ使用量
また、上記以外にも個人情報・クレジットカード情報といった重要情報の持ち回りもセッション管理の設計の中で考慮すべきである。
11.3.2.2.3. 基盤構成
本チュートリアルで作成するアプリケーションは以下の基盤上で動作させるものとする。 以下で示されている構成の具体的な数値は学習のための仮想的な値である。
- Web・AP・DBの各サーバは2台構成とする。
- APサーバのメモリ搭載量は8GB、2つ空きスロットあり
セッション管理の設計をするうえで、メモリ使用量やレプリケーションの有無を検討する際に上記構成を考慮する必要がある。
11.3.3. アプリケーションの設計
前述の要件をもとに、アプリケーションの作成方針を決定する。 本チュートリアルではドメイン層・インフラストラクチャ層は作成済みであるため、 アプリケーション層に関連する項目のみを対象とする。 また、本チュートリアルはセッションの利用方法を学習することを目的としているため、 セッション管理に直接関連しない項目は記載を省略する。
Warning
本章では、セッションを利用するプロセスの一例を示しているという点に留意する。 実際の開発では、案件ごとにある作業要領・作業手順に従う必要がある。
11.3.3.1. 画面定義
要件をもとにアプリケーションが表示する画面を定義する。 画面定義プロセスの詳細は省略する。
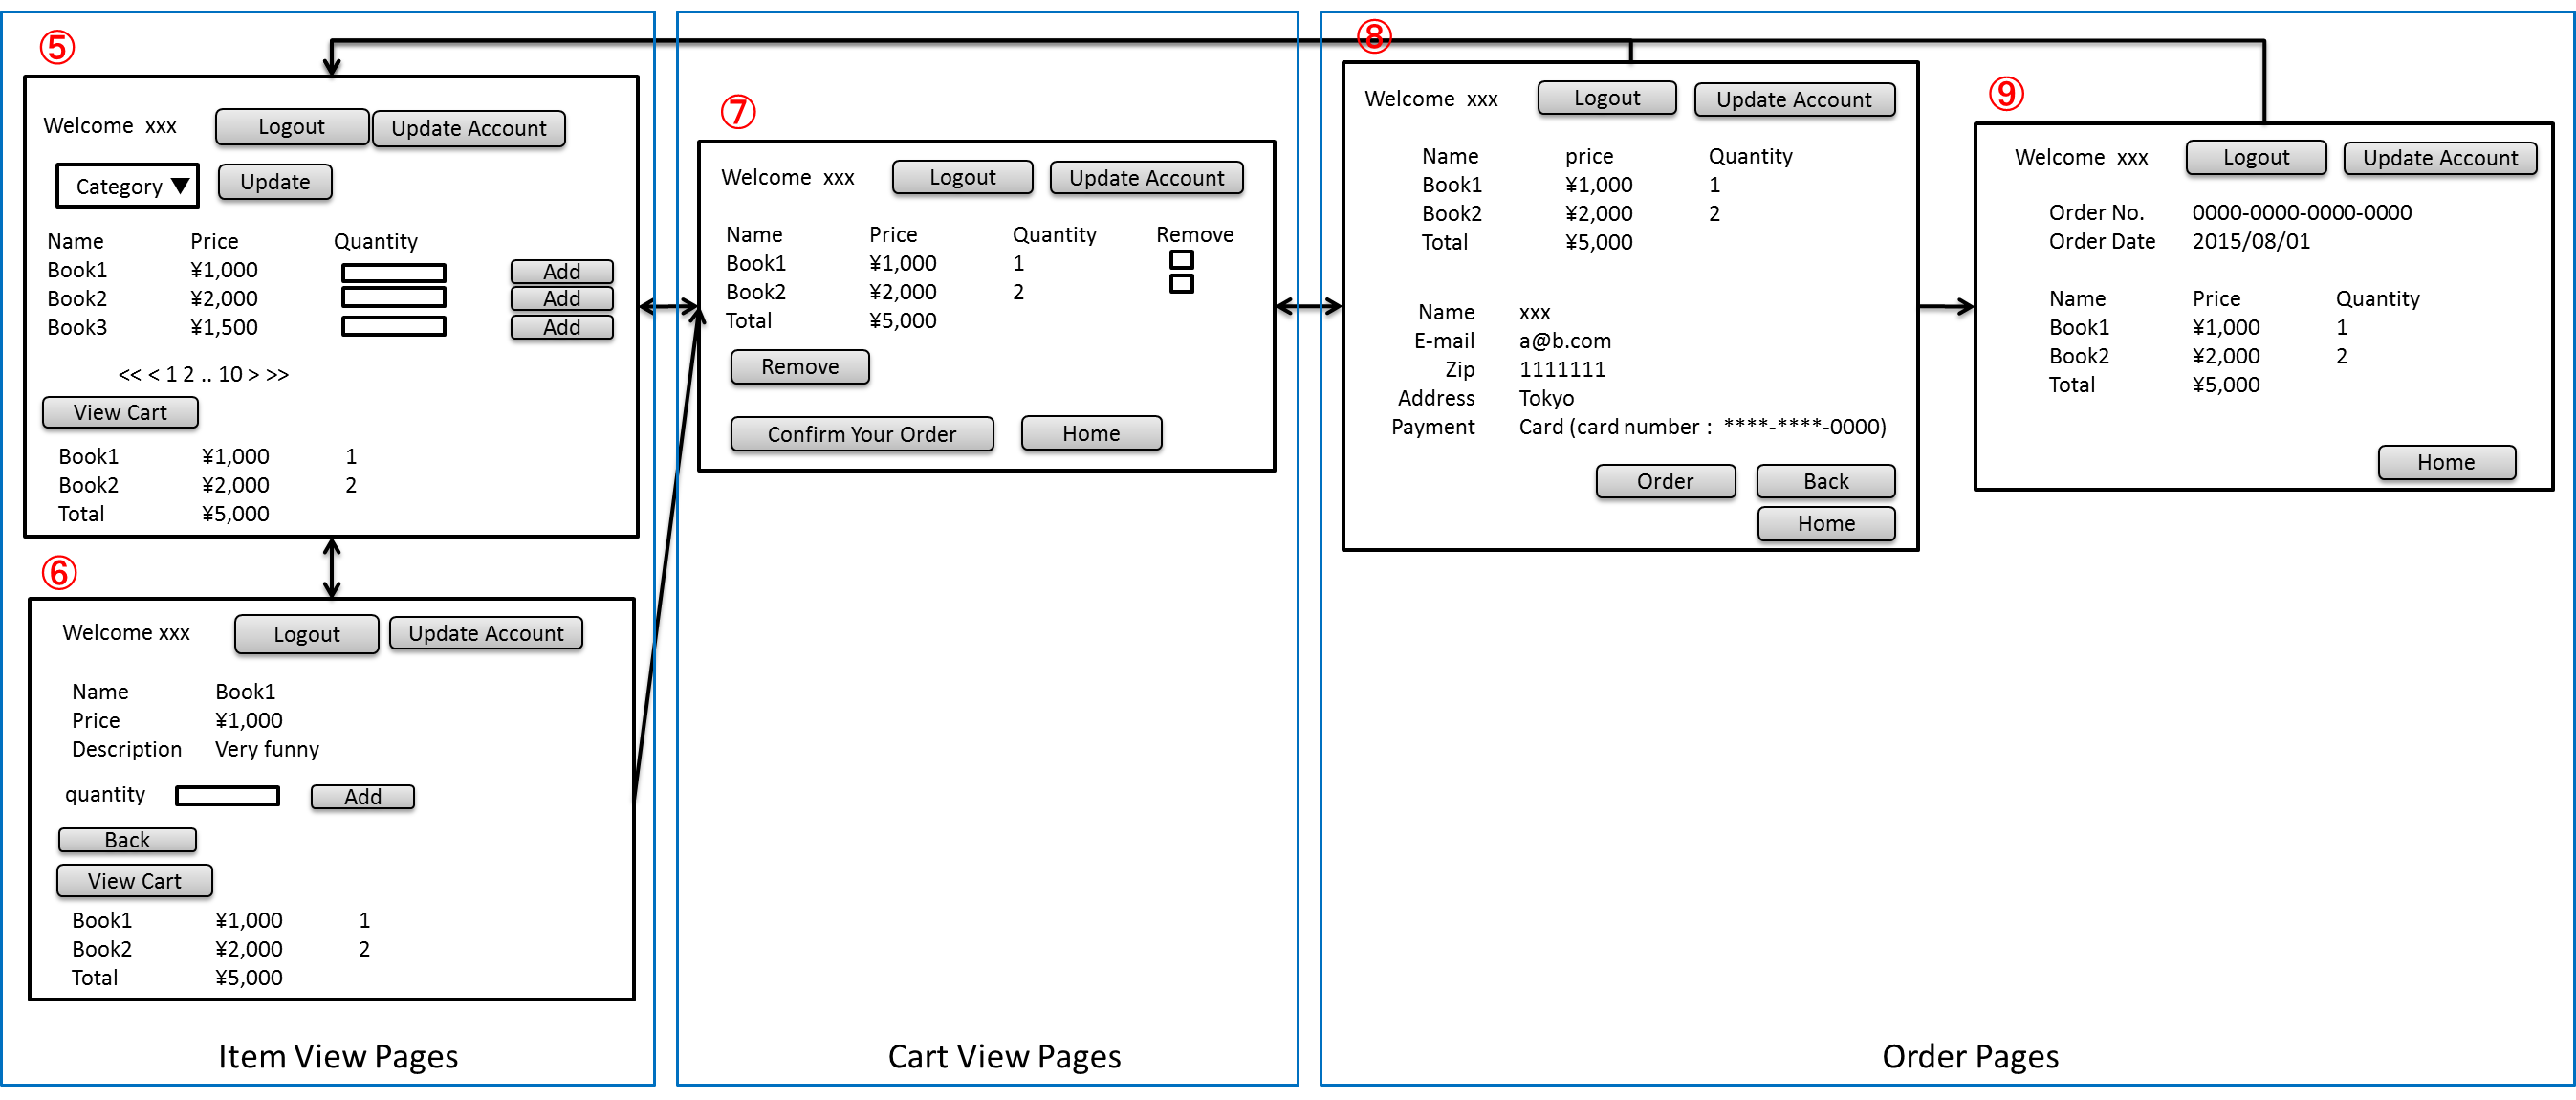
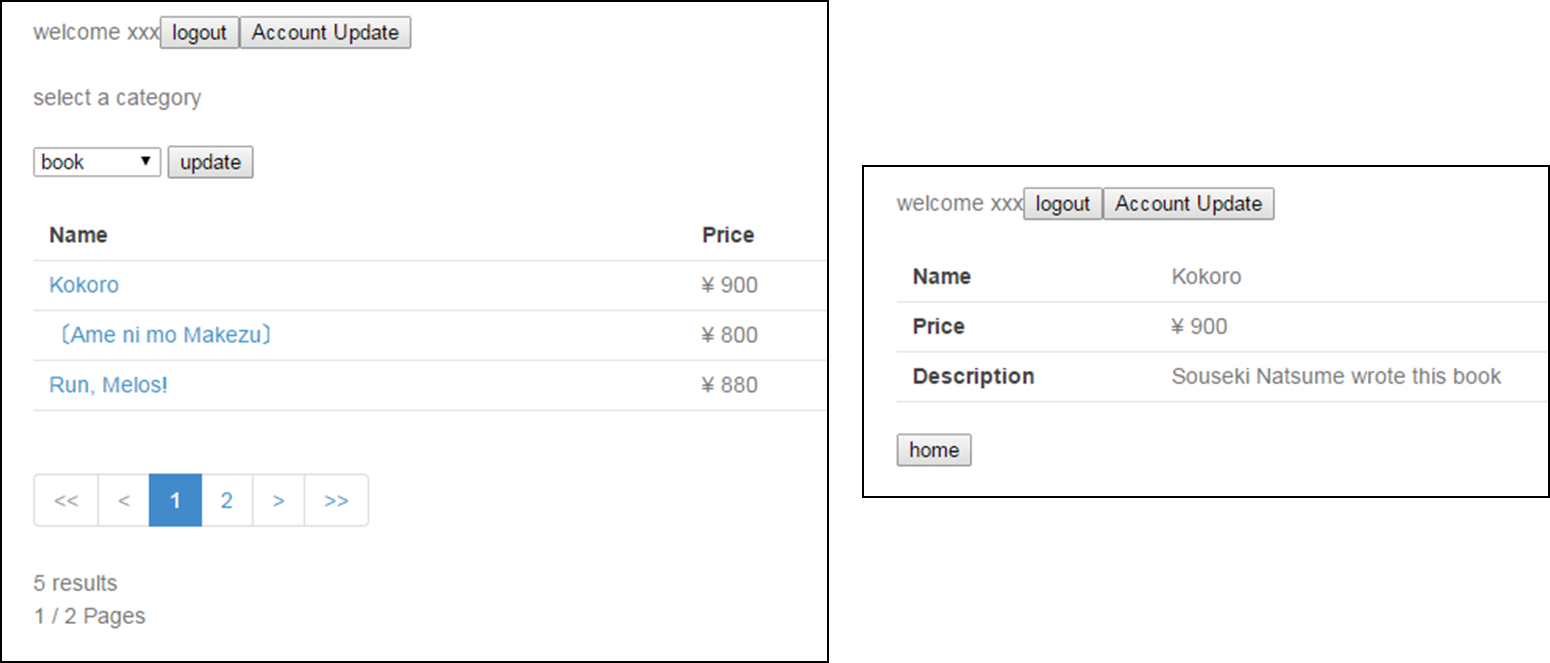
最終的に定義した本チュートリアルで作成する画面のイメージは以下のとおりである。
上記の図では省略されているが、他に以下の遷移が存在する。
- ログイン画面からログインすると、⑤の画面に遷移する
- Account Update Pagesの各画面で「Home」ボタンを押すと、⑤の画面に遷移する
- Item View Pages、Cart View Pages、Order Pagesの各画面で「Update Account」ボタンを押すと、①の画面に遷移する
- Item View Pages、Cart View Pages、Order Pagesの各画面で「Logout」ボタンを押すと、ログイン画面に遷移する
11.3.3.2. URLの抽出
画面イメージをもとに、アプリケーションが処理をするURLを決定する。
画面から発生するイベントごとにURLとパラメータを設定する。 それぞれ、次の規約通りに名称を付与する。
- URL:/<ユースケース名>
- パラメータ:?<処理名>
本アプリケーションではアカウント作成と更新でユースケースが分かれるため、 それぞれ /account/create, /account/update というURLとする。
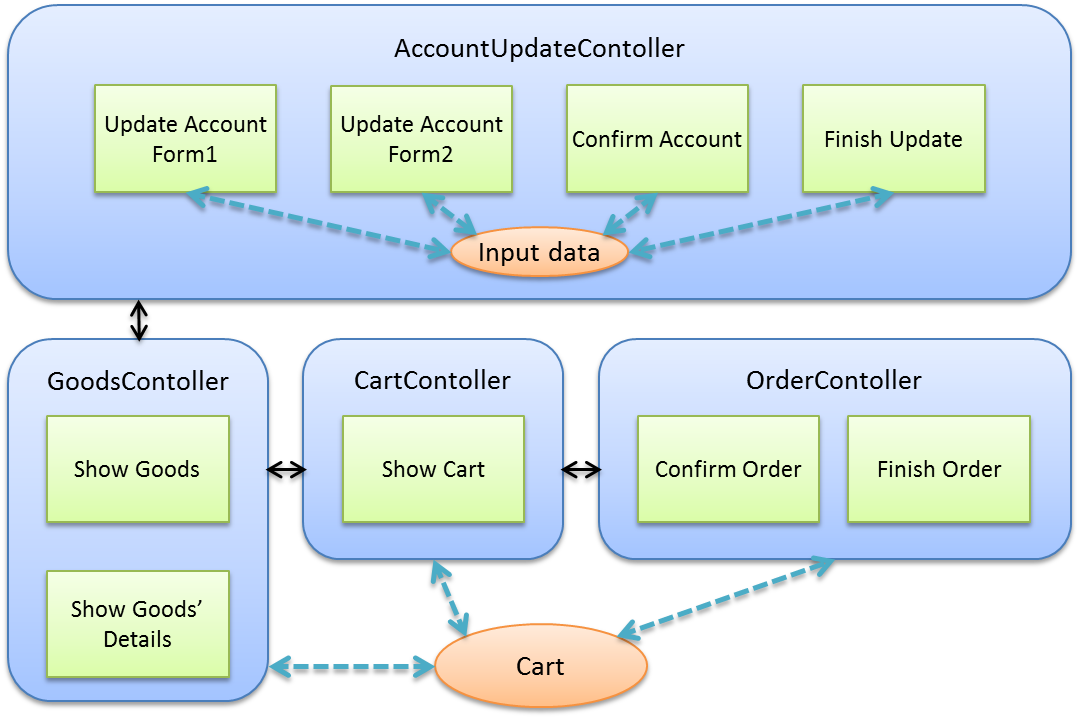
また、各URLを処理するControllerも決定する。 基本的に1つのユースケースを1つのControllerで処理させる。
最終的に、抽出されたURLは以下のように整理できる。 作成済みと書かれているControllerは、初期資材として提供されるプロジェクトに存在している。 また、作成済みと書かれているパスは、そのパスにアクセスした際の処理が前述の作成済みController内に既に書かれている。
項番 処理名 HTTPメソッド パス Controller名 画面
11.3.3.3. 入出力データの設計
画面イメージをもとに、アプリケーションが扱う入出力データを設計する。
11.3.3.3.1. データの抽出
アプリケーションの画面で扱う入出データを抽出する。 前述の画面イメージをもとに以下のデータが抽出できる。
項番 データ項目名 データの要素
11.3.3.3.2. ライフサイクルの定義
前項で抽出したデータのライフサイクルを定義する。 ライフサイクルの定義では、データがいつ生成されていつ破棄されるかを決定する。
複数画面にわたって保持する必要があるデータは、以下のように破棄のタイミングが複数あるので注意する必要がある。
- 業務が通常のフローで終了する
- 業務の途中でその業務を中止する
上記注意事項を考慮すると、前項で抽出したデータのライフサイクルを以下のように定義できる。
項番 データ項目名 ライフサイクル
11.3.3.4. セッション利用有無の判断
複数画面にわたって情報を保持する必要がある場合、セッションを利用することで実現が容易となる。一方で、セッションを利用する場合、そのデメリットも考慮する必要がある。 本チュートリアルでは、ガイドラインの セッション管理 を参考にセッションを利用するか否かを判断する。
ガイドラインには、まずセッションを使わない方針で検討して本当に必要なデータのみセッションに格納することを推奨するとの記述がある。 本チュートリアルでもセッションを使わない方針で検討を行う。
データ項目 検討内容
以上から、アカウント更新情報、アカウント情報、カート情報、商品検索情報の4つについて、セッションを利用することを検討する。
次に、セッションを利用することのデメリットを検証する。 この検証によって、デメリットの影響が無視できないと判断される場合はセッションを利用しない。
セッション利用によるデメリットとして大きく以下の3点が挙げられる。
- 複数タブ、複数ブラウザで利用した場合、互いの操作によってデータの整合性が失われる可能性がある(ことを考慮する必要がある)。
- メモリ上で管理されるため、管理するデータのサイズによってはメモリ枯渇の恐れがある。
- スケールアウトの実施や高い可用性の獲得を目的としてAPサーバを多重化した際に、セッションのレプリケーションを考慮する必要がある。その際、大量のデータをセッションで扱っていると、性能等に影響する可能性がある。
上記の観点について、それぞれ該当するリスクにどう対処するかやリスクを許容するかを検討する。
観点 検討内容 UserDetailsのサイズも含める。UserDetailsには大きく、ID、パスワード、ユーザの権限が含まれる。ユーザの権限は複数指定できるが、ここでは1つとして推定を行う。各項目の推定結果は、以下のようになる。
- アカウント情報(文字列:7項目、日付:2項目): 最大1.7Kバイト
- アカウント変更情報(文字列:8項目、日付:2項目): 最大2.0Kバイト
- カート情報(最大19商品×(文字列:3項目、数値:3項目)): 最大14.6Kバイト
- 商品検索情報(数値:2項目):32バイト
UserDetails:(文字列:3項目):0.7Kバイト1ユーザで最大合計19KB使用する。安全率を10%と考慮すると1ユーザ約21KB使用する。同時接続人数1万人を考慮しても使用量は約210MBであり、その他のメモリ使用量を考えてもメモリ搭載量8GBを大幅に下回るため、メモリ枯渇が発生する可能性は小さい。
Warning
オブジェクトのサイズを推定するには、オブジェクトのサイズを計測するためのツール(例えばSizeOfなど)を用いる必要がある。本チュートリアルの計算式はSizeOfでの実測値の傾向を参考にしているが、あくまで仮の値であることに注意する。実際のシステム開発でのサイジングの際にはどのように算出するかを個別に検討すること。
Warning
メモリ枯渇を防ぐために、セッションに格納するデータは基本的に入力データに限る。検索結果等の出力データはサイズが大きくなりやすい一方、画面操作で編集することができない読み取り専用であることが多いため、セッションに格納するには向いていない。
上記以外にも、セッションキーの管理コストの増加も考慮点の1つではある。 しかし、今回作成するアプリケーションではセッションに格納するデータ数が多くないため、セッションキーの管理コストは限定的なものであるといえる。
この結果から、セッションを利用することで発生するデメリットの影響は大きくないといえる。 最終的にセッションに格納するデータは以下のとおりである。
- アカウント変更情報
- アカウント情報
- 商品検索情報
- カート情報
本チュートリアルでは、セッションを利用してデータの持ち回りを実現するという判断を下した。 しかし、検討の結果、セッションを利用しないという判断を下すことも考えられる。 セッションを利用しない場合は、一例としてhiddenを利用してデータの持ち回りを実現する。
また、セッションを利用する際にデータの整合性を保つ方式やレプリケーションの設定が必要になることがある。
ガイドラインではトランザクショントークンチェックを使用して回避する方法を挙げている。ただし、この場合ユーザビリティの低いアプリケーションとなることに注意する。具体的な実現方法は 二重送信防止 を参照されたい。
レプリケーションの設定はAPサーバに依存するため、レプリケーションを考慮する必要がある場合は、APサーバの設定を確認する必要がある。
Warning
ここで判断したデータ以外にもセッションに格納されるデータが存在する場合がある。 ガイドラインにある項目のうち、以下の項目を利用する場合にセッションが使用される。
- Spring Securityを利用した認証・認可・CSRF対策を利用している
- 二重送信防止のためのトランザクショントークンチェックを利用している
11.3.3.5. セッション中のデータを利用するための実装方法
本項では、各データに対してセッション中のデータを利用するための実装方法を決定する。
ガイドラインでは、データの利用場所に応じて2種類の実装方法を提供している。 セッション管理 では、1つのController内で完結するデータかどうかによって利用方法を区別している。 したがって、セッションに格納するデータのライフサイクルとURLマッピングを考慮して実装方法を決める必要がある。 また、認証情報に紐づくデータである場合は、Spring Securityの機能によってセッション管理を実現することが望ましい。
これらを考慮して、セッションで扱うデータを整理した最終的な結果が以下である。
データ 特性 セッション中のデータ利用方法 @SessionAttributesアノテーションを用いた方法
アカウント情報は初期資材として提供されるプロジェクトですでに作成済みであり、 Spring Securityの機能を利用して管理されている。 そのため、本チュートリアルでは具体的な利用方法の説明は行わない。 具体的な利用方法については 認証 を参照されたい。
11.3.3.6. セッションを利用する際の考慮事項
セッションを利用することが決まった場合、以降に挙げる項目を考慮する必要がある。 それぞれの項目を検討する。
11.3.3.6.1. セッションの同期化
同一ユーザの複数のリクエストによって、セッションに格納されているオブジェクトに同時にアクセスする可能性がある。 そのため、セッションの同期化を行わない場合、想定外のエラーや、動作を引き起こす原因になりうる。
ガイドラインでは、 セッション管理 にてBeanProcessorを利用した同期化の実現方法が挙げられているため、本チュートリアルではこれを利用する。
11.3.3.6.2. セッションタイムアウト
セッションを利用する場合、セッションのタイムアウト時間を設定する必要がある。 タイムアウト時間が長すぎれば、不要なリソースをメモリ上に持ち続けることになり、 タイムアウト時間が短すぎれば、ユーザの利便性が低下する。 そのため、要件に合わせて適切な時間を設定する必要がある。
本チュートリアルでは、メモリリソースが十分に用意されていることもあり、APサーバのデフォルト値30分に設定する。
また、セッションタイムアウト後のリクエストに対する処理も検討する必要がある。 ガイドラインでは、 セッション管理 にてセッションタイムアウト後のリクエストを処理する方法が挙げられている。
本チュートリアルでは、タイムアウト後はログイン画面に遷移するように設定する。
11.3.4. プロジェクトの構成
11.3.4.1. プロジェクトの作成
すでに述べているように、本チュートリアルは一部機能が作成された状態からスタートする。 そのため、すでに作成済みのプロジェクトを用いて開発を進める。
作成済みのプロジェクトは次の手順で取得することができる。
- tutorial-apps-thymeleaf にアクセスする。
- 「Branch」ボタン押下して必要なバージョンのBranchを選択し、「Download ZIP」ボタンを押下してzipファイルをダウンロードする
- zipファイルを展開し、中のプロジェクトをインポートする。
なお、プロジェクトのインポート方法は、 チュートリアル(Todoアプリケーション) で説明済みのため、本チュートリアルでは説明を割愛する。
11.3.4.2. プロジェクトの構成
gitで取得した初期プロジェクトの構成について述べる。 取得したプロジェクトとブランクプロジェクトとの差分のみを以下に示す。
session-tutorial-init-domain
    └── src
        └── main
             ├── java
             │   └── com
             │       └── example
             │           └── session
             │               └── domain
             │                   ├── model  ... (1)
             │                   │  ├── Account.java  ... (2)
             │                   │  ├── Cart.java  ... (3)
             │                   │  ├── CartItem.java  ... (3)
             │                   │  ├── Goods.java
             │                   │  ├── Order.java  ... (4)
             │                   │  └── OrderLine.java  ... (4)
             │                   ├── repository  ... (5)
             │                   │  ├── account
             │                   │  │  └── AccountRepository.java
             │                   │  ├── goods
             │                   │  │  └── GoodsRepository.java
             │                   │  └── order
             │                   │      └── OrderRepository.java
             │                   └── service  ... (6)
             │                       ├── account
             │                       │  ├── AccountService.java
             │                       │  └── AccountServiceImpl.java
             │                       ├── goods
             │                       │  ├── GoodsService.java
             │                       │  └── GoodsServiceImpl.java
             │                       ├── order
             │                       │  ├── EmptyCartOrderException.java
             │                       │  ├── InvalidCartOrderException.java
             │                       │  ├── OrderService.java
             │                       │  └── OrderServiceImpl.java
             │                       └── userdetails
             │                           ├── AccountDetails.java
             │                           └── AccountDetailsService.java
             └── resources
                  ├── com
                  │  └── example
                  │      └── session
                  │          └── domain
                  │              └── repository  ... (7)
                  │                  ├── account
                  │                  │  └── AccountRepository.xml
                  │                  ├── goods
                  │                  │  └── GoodsRepository.xml
                  │                  └── order
                  │                      └── OrderRepository.xml
                  └── META-INF
                       ├── dozer
                       │  └── order-mapping.xml  ... (8)
                       └── spring
                           └── session-tutorial-init-codelist.xml  ... (9)
| 項番 | 説明 |
|---|---|
(1)
|
本アプリケーションで使用するmodelを扱うパッケージ。
チュートリアルを進める上で理解しておく必要があるmodelは以下で詳しく説明する。
|
(2)
|
ユーザアカウント情報を保持するクラス。
|
(3)
|
ユーザがカートに登録した商品の情報を保持するクラス。
全体を Cart が管理し、個別の商品を CartItem が管理する。
|
(4)
|
ユーザが注文した商品の情報を保持するクラス。
全体を Order が管理し、個別の商品を OrderLine が管理する。
|
(5)
|
本アプリケーションで使用するrepositoryを扱うパッケージ。
|
(6)
|
本アプリケーションで使用するserviceを扱うパッケージ。
|
(7)
|
repositoryで使用するマッピングファイルを格納するディレクトリ。
|
(8)
|
Dozer(Bean Mapper)のマッピング定義ファイル。
Cart から Order への変換が定義されている。
|
(9)
|
本アプリケーションで使用するコードリストを定義したBean定義ファイル。
|
session-tutorial-init-env
    └── src
        └── main
             └── resources
                 └── database  ... (1)
                     ├── H2-dataload.sql
                     └── H2-schema.sql
| ファイル名 | 説明 |
|---|---|
(1)
|
本アプリケーションでインメモリデータベース(H2 Database)をセットアップするためのSQLを格納するディレクトリ。
|
session-tutorial-init-web
    └── src
        └── main
             ├── java
             │   └── com
             │       └── example
             │           └── session
             │               └── app  ... (1)
             │                   ├── account
             │                   │  ├── AccountCreateController.java
             │                   │  ├── AccountCreateForm.java
             │                   │  ├── IlleagalOperationException.java
             │                   │  └── IlleagalOperationExceptionHandler.java
             │                   ├── goods
             │                   │  ├── GoodsController.java
             │                   │  └── GoodsViewForm.java
             │                   └── validation
             │                       ├── Confirm.java
             │                       └── ConfirmValidator.java
             ├── resources
             │   ├── i18n
             │   │  └── application-messages.properties  ... (2)
             │   ├── META-INF
             │   │   └── spring  ... (3)
             │   │       ├── spring-mvc.xml
             │   │       └── spring-security.xml
             │   └── ValidationMessages.properties  ... (2)
             └── webapp
                  ├── resources  ... (4)
                  │  ├── app
                  │  │  └── css
                  │  │      └── styles.css
                  │  └── vendor
                  │      └── bootstrap-3.0.0
                  │          └── css
                  │              └── bootstrap.css
                  └── WEB-INF
                      └── views  ... (5)
                          ├── account
                          │  ├── createConfirm.html
                          │  ├── createFinish.html
                          │  └── createForm.html
                          ├── common
                          │  └── error
                          │      └── illegalOperationError.html
                          ├── goods
                          │  ├── showGoods.html
                          │  └── showGoodsDetails.html
                          └── layout
                          │  └── template.html
                          └── login
                              └── loginForm.html
| 項番 | 説明 |
|---|---|
(1)
|
本アプリケーションで使用するアプリケーション層のクラスを格納するためのパッケージ。
|
(2)
|
本アプリケーションで使用するメッセージが定義されているプロパティファイル
|
(3)
|
本アプリケーションで使用するコンポーネントが定義されているBean定義ファイル
|
(4)
|
本アプリケーションで使用する静的リソースファイル
|
(5)
|
本アプリケーションで使用するThymeleafのテンプレートHTMLが格納されているディレクトリ
|
11.3.4.3. 動作確認
アプリケーション開発を行う前に、取得したプロジェクトの動作確認を行う。 STSにインポートしたプロジェクトを対象として、アプリケーションサーバを起動する アプリケーションサーバの起動方法は、 チュートリアル(Todoアプリケーション) で説明済みのため、本チュートリアルでは説明を割愛する。
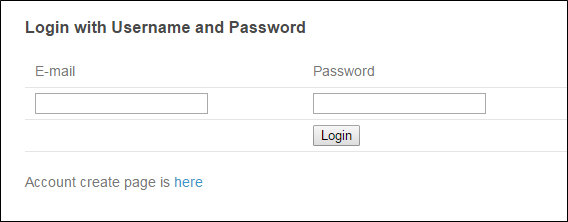
アプリケーションサーバ起動後、 http://localhost:8080/session-tutorial-init-web/loginForm にアクセスすると以下の画面が表示される。
ログイン画面上にある”here”のリンクを選択すると、アカウント作成を行うことができる。
ログイン画面にて、(E-mail=”a@b.com”、Password=”demo”)をフォーム入力するとログインすることができる。 ログイン後は商品一覧が表示される。 商品名を選択すると商品詳細を表示できる。
11.3.5. 簡易ECサイトアプリケーションの作成
11.3.5.1. アカウント情報変更機能を作成する
ユーザに情報を入力させてアカウント情報を更新する機能を作成する。
アプリケーションの設計 で説明したとおり、アカウント変更情報は @SessionAttributes アノテーションを利用して管理する。
以下にアカウント情報変更機能で実装する画面の情報を示す。
処理名 HTTPメソッド パス 画面
11.3.5.1.1. フォームオブジェクトの作成
アカウント変更情報を保持するクラスを作成する。
/session-tutorial-init-web/src/main/java/com/example/session/app/account/AccountUpdateForm.java
package com.example.session.app.account;

import java.io.Serializable;
import java.util.Date;

import javax.validation.constraints.Email;
import javax.validation.constraints.NotNull;
import javax.validation.constraints.Size;

import org.springframework.format.annotation.DateTimeFormat;

public class AccountUpdateForm implements Serializable {  // (1)

    /**
     *
     */
    private static final long serialVersionUID = 1L;

    private String id;

    // (2)
    @NotNull(groups = { Wizard1.class })
    @Size(min = 1, max = 255, groups = { Wizard1.class })
    private String name;

    @NotNull(groups = { Wizard1.class })
    @Size(min = 1, max = 255, groups = { Wizard1.class })
    @Email(groups = { Wizard1.class })
    private String email;

    @NotNull(groups = { Wizard1.class })
    @DateTimeFormat(iso = DateTimeFormat.ISO.DATE)
    private Date birthday;

    @NotNull(groups = { Wizard1.class })
    @Size(min = 7, max = 7, groups = { Wizard1.class })
    private String zip;

    @NotNull(groups = { Wizard1.class })
    @Size(min = 1, max = 255, groups = { Wizard1.class })
    private String address;

    @Size(min = 16, max = 16, groups = { Wizard2.class })
    private String cardNumber;

    @DateTimeFormat(pattern = "yyyy-MM")
    private Date cardExpirationDate;

    @Size(min = 1, max = 255, groups = { Wizard2.class })
    private String cardSecurityCode;

    public String getId() {
        return id;
    }

    public void setId(String id) {
        this.id = id;
    }

    public String getName() {
        return name;
    }

    public void setName(String name) {
        this.name = name;
    }

    public String getEmail() {
        return email;
    }

    public void setEmail(String email) {
        this.email = email;
    }

    public Date getBirthday() {
        return birthday;
    }

    public void setBirthday(Date birthday) {
        this.birthday = birthday;
    }

    public String getZip() {
        return zip;
    }

    public void setZip(String zip) {
        this.zip = zip;
    }

    public String getAddress() {
        return address;
    }

    public void setAddress(String address) {
        this.address = address;
    }

    public String getCardNumber() {
        return cardNumber;
    }

    public void setCardNumber(String cardNumber) {
        this.cardNumber = cardNumber;
    }

    public Date getCardExpirationDate() {
        return cardExpirationDate;
    }

    public void setCardExpirationDate(Date cardExpirationDate) {
        this.cardExpirationDate = cardExpirationDate;
    }

    public String getCardSecurityCode() {
        return cardSecurityCode;
    }

    public void setCardSecurityCode(String cardSecurityCode) {
        this.cardSecurityCode = cardSecurityCode;
    }

    public String getLastFourOfCardNumber() {
        if (cardNumber == null) {
            return "";
        }
        return cardNumber.substring(cardNumber.length() - 4);
    }

    public static interface Wizard1 {

    }

    public static interface Wizard2 {

    }
}
| 項番 | 説明 |
|---|---|
(1)
|
このクラスのインスタンスをセッションに格納するため、
Serializable を実装しておく。 |
(2)
|
画面遷移ごとに入力チェックの対象を指定するために、バリデーションのグループ化を行う。
上記例では、1ページ目の入力項目と2ページ目の入力項目にそれぞれに対応した入力チェックを実現するために、2つのグループを作成している。
|
11.3.5.1.2. Controllerの作成
Controllerを作成する。
Controllerでは、入力情報を受け取るフォームを @SessionAttributes アノテーションで管理させる記述が必要である。
/session-tutorial-init-web/src/main/java/com/example/session/app/account/AccountUpdateController.java
package com.example.session.app.account;

import javax.inject.Inject;

import com.github.dozermapper.core.Mapper;
import org.springframework.beans.propertyeditors.StringTrimmerEditor;
import org.springframework.security.core.annotation.AuthenticationPrincipal;
import org.springframework.stereotype.Controller;
import org.springframework.validation.BindingResult;
import org.springframework.validation.annotation.Validated;
import org.springframework.web.bind.WebDataBinder;
import org.springframework.web.bind.annotation.GetMapping;
import org.springframework.web.bind.annotation.InitBinder;
import org.springframework.web.bind.annotation.ModelAttribute;
import org.springframework.web.bind.annotation.PostMapping;
import org.springframework.web.bind.annotation.RequestMapping;
import org.springframework.web.bind.annotation.SessionAttributes;
import org.springframework.web.bind.support.SessionStatus;
import org.springframework.web.servlet.mvc.support.RedirectAttributes;
import org.terasoluna.gfw.common.message.ResultMessages;

import com.example.session.app.account.AccountUpdateForm.Wizard1;
import com.example.session.app.account.AccountUpdateForm.Wizard2;
import com.example.session.domain.model.Account;
import com.example.session.domain.service.account.AccountService;
import com.example.session.domain.service.userdetails.AccountDetails;

@Controller
@RequestMapping("account/update")
@SessionAttributes(value = { "accountUpdateForm" }) // (1)
public class AccountUpdateController {

    @Inject
    AccountService accountService;

    @Inject
    Mapper beanMapper;

    @InitBinder
    public void initBinder(WebDataBinder binder) {
        binder.registerCustomEditor(String.class, new StringTrimmerEditor(true));
    }

    @ModelAttribute(value = "accountUpdateForm") // (2)
    public AccountUpdateForm setUpAccountForm() {
        return new AccountUpdateForm();
    }

    @GetMapping(params = "form1")
    public String showUpdateForm1(
            @AuthenticationPrincipal AccountDetails userDetails,
            AccountUpdateForm form) { // (3)

        Account account = accountService.findOne(userDetails.getAccount()
                .getEmail());
        beanMapper.map(account, form);

        return "account/updateForm1";
    }

    @PostMapping(params = "form2")
    public String showUpdateForm2(
            @Validated(Wizard1.class) AccountUpdateForm form,
            BindingResult result) {

        if (result.hasErrors()) {
            return "account/updateForm1";
        }

        return "account/updateForm2";
    }

    @PostMapping(params = "redoForm1")
    public String redoUpdateForm1() {
        return "account/updateForm1";
    }

    @PostMapping(params = "confirm")
    public String confirmUpdate(
            @Validated(Wizard2.class) AccountUpdateForm form,
            BindingResult result) {

        if (result.hasErrors()) {
            return "account/updateForm2";
        }

        return "account/updateConfirm";
    }

    @PostMapping(params = "redoForm2")
    public String redoUpdateForm2() {
        return "account/updateForm2";
    }

    @PostMapping
    public String update(
            @AuthenticationPrincipal AccountDetails userDetails,
            @Validated({ Wizard1.class, Wizard2.class }) AccountUpdateForm form,
            BindingResult result, RedirectAttributes attributes, SessionStatus sessionStatus) {

        if (result.hasErrors()) {
            ResultMessages messages = ResultMessages.error();
            messages.add("e.st.ac.5001");
            throw new IllegalOperationException(messages);
        }

        Account account = beanMapper.map(form, Account.class);
        accountService.update(account);
        userDetails.setAccount(account);
        attributes.addFlashAttribute("account", account);
        sessionStatus.setComplete();  // (4)

        return "redirect:/account/update?finish";
    }

    @GetMapping(params = "finish")
    public String finishUpdate() {
        return "account/updateFinish";
    }

    @GetMapping(params = "home")
    public String home(SessionStatus sessionStatus) {
        sessionStatus.setComplete();
        return "redirect:/goods";
    }

}
| 項番 | 説明 |
|---|---|
(1)
|
@SessionAttributes アノテーションの value 属性に、セッションに格納するオブジェクトの属性名を指定する。上記例は、属性名が
accountUpdateForm のオブジェクトが、セッションに格納される。 |
(2)
|
Model オブジェクトに格納する属性名を、 value 属性に指定する。上記例では、返却したオブジェクトが、
accountUpdateForm という属性名でセッションに格納される。value属性を指定した場合、セッションにオブジェクトを格納した後のリクエストで、
@ModelAttribute アノテーションの付与されたメソッドが呼び出されなくなるため、無駄なオブジェクトの生成が行われないというメリットがある。 |
(3)
|
@SessionAttributes アノテーションによって管理されたオブジェクトを利用するには、そのオブジェクトを受け取れるようメソッドに引数を追加する。入力チェックが必要であれば
@Validated アノテーションを利用する。上記例では、
AccountUpdateForm のデフォルトの属性名である accountUpdateForm を属性名にもつオブジェクトが引数として渡される。 |
(4)
|
SessionStatus オブジェクトの setComplete メソッドを呼び出し、オブジェクトをセッションから削除する。 |
Warning
@SessionAttributes アノテーションで管理しているオブジェクトは、明示的に削除を行わない限りセッション中に残り続ける。
そのため、Controllerが扱う画面外に遷移して再度戻ってきた場合にも保持していたデータを参照できる。
メモリの枯渇を防ぐために、不要になったデータは必ず削除すること。
Warning
ブラウザのボタンでバックされたり、URLを直接入力して画面遷移した場合は、setComplete メソッドが呼ばれず、セッションがクリアされずに残ってしまう点に留意する必要がある。
11.3.5.1.3. テンプレートHTMLの作成
@SessionAttributes アノテーションで管理しているフォームオブジェクトにデータの受け渡しをする画面を作成する。
1ページ目の入力画面
/session-tutorial-init-web/src/main/webapp/WEB-INF/views/account/updateForm1.html
<!DOCTYPE html>
<html xmlns:th="http://www.thymeleaf.org"
th:replace="~{layout/template :: layout(~{::title},~{::body/content()})}">
<head>
<title>Account Update Page</title>
</head>
<body>
<div class="container">
<!--/* (1) */-->
<form th:action="@{/account/update}" method="post" th:object="${accountUpdateForm}">
<h2>Account Update Page 1/2</h2>
<table>
<tr>
<td><label for="name" name="name" th:errorclass="error-label">name</label></td>
<!--/* (2) */-->
<td><input type="text" th:field="*{name}" th:errorclass="error-input">
<span id="name-errors" th:errors="*{name}" class="error-messages"></span>
</td>
</tr>
<tr>
<td><label for="email" name="email" th:errorclass="error-label">e-mail</label></td>
<td><input type="text" th:field="*{email}" th:errorclass="error-input">
<span id="email-errors" th:errors="*{email}" class="error-messages"></span>
</td>
</tr>
<tr>
<td><label for="birthday" name="birthday" th:errorclass="error-label">birthday</label></td>
<td><input type="date" name="birthday" id="birthday"
th:value="${#dates.format(accountUpdateForm.birthday, 'yyyy-MM-dd')}">
<span id="birthday-errors" th:errors="*{birthday}" class="error-messages"></span>
</td>
</tr>
<tr>
<td><label for="zip" name="zip" th:errorclass="error-label">zip</label></td>
<td><input type="text" th:field="*{zip}" th:errorclass="error-input">
<span id="zip-errors" th:errors="*{zip}" class="error-messages"></span>
</td>
</tr>
<tr>
<td><label for="address" name="address" th:errorclass="error-label">address</label></td>
<td><input type="text" th:field="*{address}" th:errorclass="error-input">
<span id="address-errors" th:errors="*{address}" class="error-messages"></span>
</td>
</tr>
<tr>
<td> </td>
<td><input type="submit" name="form2" id="next" value="next"></td>
</tr>
</table>
</form>
<form method="get" th:action="@{/account/update}">
<input type="submit" name="home" id="home" value="home">
</form>
</div>
</body>
</html>
| 項番 | 説明 |
|---|---|
(1)
|
入力データを受け取るフォームオブジェクトの属性名を
th:object 属性に変数式( ${} )で指定する。上記例は、属性名が
accountUpdateForm のオブジェクトが入力データを受け取る。 |
(2)
|
input タグの th:field 属性に入力データを格納するオブジェクトの要素名を指定する。この方法を利用すると、指定したオブジェクトの要素名にすでにデータがある場合、その値が入力フォームのデフォルト値となる。
|
2ページ目の入力画面
/session-tutorial-init-web/src/main/webapp/WEB-INF/views/account/updateForm2.html
<!DOCTYPE html>
<html xmlns:th="http://www.thymeleaf.org"
th:replace="~{layout/template :: layout(~{::title},~{::body/content()})}">
<head>
<title>Account Update Page</title>
</head>
<body>
<div class="container">
<form th:action="@{/account/update}" method="post" th:object="${accountUpdateForm}">
<h2>Account Update Page 2/2</h2>
<table>
<tr>
<td><label for="cardNumber" name="cardNumber" th:errorclass="error-label">your card number</label></td>
<td><input type="text" th:field="*{cardNumber}" th:errorclass="error-input">
<span id="cardNumber-errors" th:errors="*{cardNumber}" class="error-messages"></span>
</td>
</tr>
<tr>
<td><label for="cardExpirationDate" name="cardExpirationDate"
th:errorclass="error-label">expiration date of your card</label></td>
<td><input type="month" name="cardExpirationDate" id="cardExpirationDate"
th:value="${#dates.format(accountUpdateForm.cardExpirationDate, 'yyyy-MM')}">
<span id="cardExpirationDate-errors" th:errors="*{cardExpirationDate}" class="error-messages"></span>
</td>
</tr>
<tr>
<td><label for="cardSecurityCode" name="cardSecurityCode"
th:errorclass="error-label">security code of your card</label>
</td>
<td><input type="text" th:field="*{cardSecurityCode}" th:errorclass="error-input">
<span id="cardSecurityCode-errors" th:errors="*{cardSecurityCode}" class="error-messages"></span>
</td>
</tr>
<tr>
<td> </td>
<td><input type="submit" name="redoForm1" id="back" value="back">
<input type="submit" name="confirm" id="confirm" value="confirm">
</td>
</tr>
</table>
</form>
<form method="get" th:action="@{/account/update}">
<input type="submit" name="home" id="home" value="home">
</form>
</div>
</body>
</html>
確認画面
/session-tutorial-init-web/src/main/webapp/WEB-INF/views/account/updateConfirm.html
<!DOCTYPE html>
<html xmlns:th="http://www.thymeleaf.org"
th:replace="~{layout/template :: layout(~{::title},~{::body/content()})}">
<head>
<title>Account Update Page</title>
</head>
<body>
<div class="container">
<form th:action="@{/account/update}" method="post">
<h3>Your account will be updated with below information. Please push "update" button if it's OK.</h3>
<table th:object="${accountUpdateForm}">
<tr>
<td><label for="name">name</label></td>
<td id="name" th:text="*{name}"></td>
</tr>
<tr>
<td><label for="email">e-mail</label></td>
<td id="email" th:text="*{email}"></td>
</tr>
<tr>
<td><label for="birthday">birthday</label></td>
<td id="birthday" th:text="*{#dates.format(birthday, 'yyyy-MM-dd')}"></td>
</tr>
<tr>
<td><label for="zip">zip</label></td>
<td id="zip" th:text="*{zip}"></td>
</tr>
<tr>
<td><label for="address">address</label></td>
<td id="address" th:text="*{address}"></td>
</tr>
<tr>
<td><label for="cardNumber">your card number</label></td>
<td id="cardNumber" th:text="|****-****-****-*{lastFourOfCardNumber}|"></td> <!--/* (1) */-->
</tr>
<tr>
<td><label for="cardExpirationDate">expiration date of your card</label></td>
<td id="cardExpirationDate" th:text="*{#dates.format(cardExpirationDate, 'yyyy-MM')}"></td>
</tr>
<tr>
<td><label for="cardSecurityCode">security code of your card</label></td>
<td id="cardSecurityCode" th:text="*{cardSecurityCode}"></td>
</tr>
<tr>
<td> </td>
<td><input type="submit" name="redoForm2" id="back" value="back">
<input type="submit" id="update" value="update">
</td>
</tr>
</table>
</form>
<form method="get" th:action="@{/account/update}">
<input type="submit" name="home" id="home" value="home">
</form>
</div>
</body>
</html>
| 項番 | 説明 |
|---|---|
(1)
|
カード番号の下4桁以外が「*」でマスキングされて表示される。
|
完了画面
/session-tutorial-init-web/src/main/webapp/WEB-INF/views/account/updateFinish.html
<!DOCTYPE html>
<html xmlns:th="http://www.thymeleaf.org"
    th:replace="~{layout/template :: layout(~{::title},~{::body/content()})}">
<head>
<title>Account Update Page</title>
</head>
<body>
    <div class="container">

        <h3>Your account has updated.</h3>
        <table th:object="${account}">
            <tr>
                <td><label for="name">name</label></td>
                <td id="name" th:text="*{name}"></td>
            </tr>
            <tr>
                <td><label for="email">e-mail</label></td>
                <td id="email" th:text="*{email}"></td>
            </tr>
            <tr>
                <td><label for="birthday">birthday</label></td>
                <td id="birthday" th:text="*{#dates.format(birthday, 'yyyy-MM-dd')}"></td>
            </tr>
            <tr>
                <td><label for="zip">zip</label></td>
                <td id="zip" th:text="*{zip}"></td>
            </tr>
            <tr>
                <td><label for="address">address</label></td>
                <td id="address" th:text="*{address}"></td>
            </tr>
            <tr>
                <td><label for="cardNumber">your card number</label></td>
                <td id="cardNumber" th:text="|****-****-****-*{lastFourOfCardNumber}|"></td> <!--/* (1) */-->
            </tr>
            <tr>
                <td><label for="cardExpirationDate">expiration date of your card</label></td>
                <td id="cardExpirationDate" th:text="*{#dates.format(cardExpirationDate, 'yyyy-MM')}"></td>
            </tr>
            <tr>
                <td><label for="cardSecurityCode">security code of your card</label></td>
                <td id="cardSecurityCode" th:text="*{cardSecurityCode}"></td>
            </tr>
        </table>

        <form method="get" th:action="@{/account/update}">
            <input type="submit" name="home" id="home" value="home">
        </form>

    </div>
</body>
</html>
| 項番 | 説明 |
|---|---|
(1)
|
カード番号の下4桁以外が「*」でマスキングされて表示される。
|
11.3.5.1.4. 動作確認
ここまでの実装でアカウント情報更新を行うことができるようになっている。 商品一覧表示画面の上部にある「Account Update」のボタンを押下することでアカウント情報更新画面に遷移する。 現在、ログインしているアカウントの情報が初期値としてフォームに表示される。 フォームの値を変更して次の画面に進んでいくことで、最終的にアカウントの情報が更新される。
ここまでの実装で入力値を受け取るフォームをセッションに格納しているため、 データの持ち回りが簡単に実現できる。 また、「home」ボタンを押した際にセッションが破棄されるため、 「home」ボタンを押した後にアカウント情報更新画面に遷移すると、変更情報がリセットされる。
11.3.5.2. カートアイテム登録機能を作成する
指定した数量で商品をカートに登録する機能を作成する。
アプリケーションの設計 で説明したとおり、カート情報はセッションスコープのBeanとして管理する。
以下にカートアイテム登録機能で実装する画面の情報を示す。
処理名 HTTPメソッド パス 画面
11.3.5.2.1. セッションスコープBeanを定義
カート情報を保持するオブジェクトは、 Cart.java としてすでに作成済みである。
そのため、このオブジェクトをセッションスコープのBeanとして扱えるように設定を加える。
セッションスコープのBeanを使用する方法として、 セッション管理 に2種類の設定方法が記載されている。 本チュートリアルでは、component-scanを使用してbeanを定義する。
Warning
セッションスコープのBeanとして登録するためには対象のオブジェクトが Serializable である必要がある
component-scanを用いてセッションスコープのBeanを定義するには、 Beanとして登録したいクラスに以下のアノテーションを追加すればよい。
/session-tutorial-init-domain/src/main/java/com/example/session/domain/model/Cart.java
package com.example.session.domain.model;

import java.io.Serializable;
import java.security.MessageDigest;
import java.security.NoSuchAlgorithmException;
import java.util.Base64;
import java.util.Collection;
import java.util.LinkedHashMap;
import java.util.Map;
import java.util.Set;

import org.springframework.context.annotation.Scope;
import org.springframework.context.annotation.ScopedProxyMode;
import org.springframework.stereotype.Component;
import org.springframework.util.SerializationUtils;

@Component // (1)
@Scope(value = "session", proxyMode = ScopedProxyMode.TARGET_CLASS) // (2)
public class Cart implements Serializable {

    // omitted

}
| 項番 | 説明 |
|---|---|
(1)
|
component-scanの対象となるように
@Componentアノテーションを指定する |
(2)
|
Beanのスコープを
sessionにする。また、 proxyMode 属性でScopedProxyMode.TARGET_CLASSを指定し、scoped-proxyを有効にする。 |
また、component-scanの対象となるbase-packageをBean定義ファイルに指定する必要がある。 しかし、本チュートリアルでは作成済みのBean定義ファイルにすでに以下の記述があるため、新たに記述を追加する必要はない。
/session-tutorial-init-domain/src/main/resources/META-INF/spring/session-tutorial-init-domain.xml
<!-- (1) -->
<context:component-scan base-package="com.example.session.domain" />
| 項番 | 説明 |
|---|---|
(1)
|
component-scanの対象となるパッケージを指定する。
|
11.3.5.2.2. フォームオブジェクトの作成
注文する商品の情報を保持するクラスを作成する。
/session-tutorial-init-web/src/main/java/com/example/session/app/goods/GoodAddForm.java
package com.example.session.app.goods;

import java.io.Serializable;

import javax.validation.constraints.Min;
import javax.validation.constraints.NotNull;

public class GoodAddForm implements Serializable {

    /**
     *
     */
    private static final long serialVersionUID = 1L;

    @NotNull
    private String goodsId;

    @NotNull
    @Min(1)
    private int quantity;

    public String getGoodsId() {
        return goodsId;
    }

    public void setGoodsId(String goodsId) {
        this.goodsId = goodsId;
    }

    public int getQuantity() {
        return quantity;
    }

    public void setQuantity(int quantity) {
        this.quantity = quantity;
    }
}
11.3.5.2.3. Controllerの作成
Controllerを作成する。
一部リクエストを処理するためにすでに作成されているため、以下のコードを追加する。
/session-tutorial-init-web/src/main/java/com/example/session/app/goods/GoodsController.java
package com.example.session.app.goods;

import javax.inject.Inject;

import org.springframework.data.domain.Page;
import org.springframework.data.domain.Pageable;
import org.springframework.stereotype.Controller;
import org.springframework.ui.Model;
import org.springframework.validation.BindingResult;
import org.springframework.validation.annotation.Validated;
import org.springframework.web.bind.annotation.GetMapping;
import org.springframework.web.bind.annotation.ModelAttribute;
import org.springframework.web.bind.annotation.PathVariable;
import org.springframework.web.bind.annotation.PostMapping;
import org.springframework.web.bind.annotation.RequestMapping;
import org.springframework.web.servlet.mvc.support.RedirectAttributes;
import org.terasoluna.gfw.common.message.ResultMessages;

import com.example.session.domain.model.Cart;
import com.example.session.domain.model.CartItem;
import com.example.session.domain.model.Goods;
import com.example.session.domain.service.goods.GoodsService;

@Controller
@RequestMapping("goods")
public class GoodsController {

    @Inject
    GoodsService goodsService;

    // (1)
    @Inject
    Cart cart;

    @ModelAttribute(value = "goodViewForm")
    public GoodViewForm setUpCategoryId() {
        return new GoodViewForm();
    }

    @GetMapping
    String showGoods(GoodViewForm form, Pageable pageable, Model model) {

        Page<Goods> page = goodsService.findByCategoryId(form.getCategoryId(),
                pageable);
        model.addAttribute("page", page);
        return "goods/showGoods";
    }

    @GetMapping("/{goodsId}")
    public String showGoodsDetail(@PathVariable String goodsId, Model model) {

        Goods goods = goodsService.findOne(goodsId);
        model.addAttribute(goods);

        return "/goods/showGoodsDetail";
    }

    @PostMapping("/addToCart")
    public String addToCart(@Validated GoodAddForm form, BindingResult result,
            RedirectAttributes attributes) {

        if (result.hasErrors()) {
            ResultMessages messages = ResultMessages.error()
                    .add("e.st.go.5001");
            attributes.addFlashAttribute(messages);
            return "redirect:/goods";
        }

        Goods goods = goodsService.findOne(form.getGoodsId());
        CartItem cartItem = new CartItem();
        cartItem.setGoods(goods);
        cartItem.setQuantity(form.getQuantity());
        cart.add(cartItem); // (2)

        return "redirect:/goods";
    }
}
| 項番 | 説明 |
|---|---|
(1)
|
セッションスコープのBeanをDIコンテナから取得する。
|
(2)
|
セッションスコープのBeanにデータを追加する。
画面に情報を表示させるために、オブジェクトをModelに追加する必要はない。
|
11.3.5.2.4. テンプレートHTMLの作成
カートの中身を表示するためのHTMLを作成する。
HTMLもすでに作成されているため、以下に示すコードをbodyタグの最後に追加する。
/session-tutorial-init-web/src/main/webapp/WEB-INF/views/goods/showGoods.html
<!DOCTYPE html>
<html xmlns:th="http://www.thymeleaf.org"
xmlns:sec="http://www.thymeleaf.org/extras/spring-security"
th:replace="~{layout/template :: layout(~{::title},~{::body/content()})}">
<head>
<title>Item List Page</title>
</head>
<body>
<div style="display: inline-flex">
welcome <span id="userName" sec:authentication="principal.account.name"></span>
<form method="post" th:action="@{/logout}">
<input type="submit" id="logout" value="logout">
</form>
<form method="get" th:action="@{/account/update}">
<input type="submit" name="form1" id="updateAccount" value="Account Update">
</form>
</div>
<br>
<br>
<div class="container">
<p>select a category</p>
<form method="get" th:action="@{/goods/}" th:object="${goodViewForm}">
<select th:field="*{categoryId}">
<option th:each="category : ${CL_CATEGORIES}" th:value="${category.key}" th:text="${category.value}"></option>
</select>
<input type="submit" id="update" value="update">
</form>
<br>
<div th:if="${resultMessages != null}" th:class="|alert alert-${resultMessages.type}|">
<ul>
<li th:each="message : ${resultMessages}" th:text="${#messages.msgWithParams(message.code, message.args)}"></li>
</ul>
</div>
<table>
<tr>
<th>Name</th>
<th>Price</th>
<th>Quantity</th>
</tr>
<tr th:each="goods, status : ${page.content}">
<td><a th:id="${goods.name}" th:href="@{/goods/{id}(id=${goods.id})}" th:text="${goods.name}"></a></td>
<td th:text="|¥${#numbers.formatInteger(goods.price, 1, 'COMMA')}|"></td>
<td>
<form method="post" th:action="@{/goods/addToCart}" th:object="${goodAddForm}">
<input type="text" name="quantity" th:id="|quantity${status.index}|" value="1">
<input type="hidden" name="goodsId" th:value="${goods.id}">
<input type="submit" th:id="|add${status.index}|" value="add">
</form>
</td>
</tr>
</table>
<div class="paginationPart" th:object="${page}">
<ul th:if="*{totalElements} != 0" class="pagination"
th:with="disabledHref = 'javascript:void(0)', currentUrl = ${#request.requestURI}">
<li th:class="*{isFirst()} ? 'disabled'">
<a th:href="*{isFirst()} ? ${disabledHref} : @{{currentUrl}(currentUrl=${currentUrl},page=0,size=*{size})}"><<</a>
</li>
<li th:class="*{isFirst()} ? 'disabled'">
<a th:href="*{isFirst()} ? ${disabledHref} : @{{currentUrl}(currentUrl=${currentUrl},page=*{number - 1},size=*{size})}"><</a>
</li>
<li th:each="i : ${#numbers.sequence(1, page.totalPages)}"
th:with="isActive=${i} == *{number + 1}" th:class="${isActive} ? 'active'">
<a th:href="${isActive} ? ${disabledHref} : @{{currentUrl}(currentUrl=${currentUrl},page=${i - 1},size=*{size})}" th:text="${i}"></a>
</li>
<li th:class="*{isLast()} ? 'disabled'">
<a th:href="*{isLast()} ? ${disabledHref} : @{{currentUrl}(currentUrl=${currentUrl},page=*{number + 1},size=*{size})}">></a>
</li>
<li th:class="*{isLast()} ? 'disabled'">
<a th:href="*{isLast()} ? ${disabledHref} : @{{currentUrl}(currentUrl=${currentUrl},page=*{totalPages - 1},size=*{size})}">>></a>
</li>
</ul>
</div>
</div>
<div>
<p>
[[${#numbers.formatInteger(page.totalElements, 1, 'COMMA')}]] results <br>
[[${page.number + 1}]] / [[${page.totalPages}]] Pages
</p>
</div>
<!--/* (1) */-->
<div>
<form method="get" th:action="@{/cart}">
<input type="submit" id="viewCart" value="view cart">
</form>
<table>
<!--/* (2) */-->
<tr th:each="cartItem, status : ${@cart.cartItems}" th:object="${cartItem}">
<td th:id="|itemName${status.index}|" th:text="*{goods.name}"></td>
<td th:id="|itemPrice${status.index}|" th:text="|¥*{#numbers.formatInteger(goods.price, 1, 'COMMA')}|"></td>
<td th:id="|itemQuantity${status.index}|" th:text="*{quantity}"></td>
</tr>
<tr>
<td>Total</td>
<td id="totalPrice" th:text="|¥${#numbers.formatInteger(@cart.totalAmount, 1, 'COMMA')}|"></td>
<td></td>
</tr>
</table>
</div>
</body>
</html>
| 項番 | 説明 |
|---|---|
(1)
|
セッションスコープのBeanの中身を画面に表示させるために、Beanを変数に格納する。
上記例では、セッションスコープにあるCartオブジェクトを変数cartに格納している。
|
(2)
|
(1)で作成した変数を通して、セッションスコープのBeanの中身を参照する。
上記例では、変数cartを通してセッションスコープのBeanの中身を参照している。
|
/session-tutorial-init-web/src/main/webapp/WEB-INF/views/goods/showGoodsDetail.html
<!DOCTYPE html>
<html xmlns:th="http://www.thymeleaf.org"
xmlns:sec="http://www.thymeleaf.org/extras/spring-security"
th:replace="~{layout/template :: layout(~{::title},~{::body/content()})}">
<head>
<title>Item List Page</title>
</head>
<body>
<div style="display: inline-flex">
welcome <span id="userName" sec:authentication="principal.account.name"></span>
<form method="post" th:action="@{/logout}">
<input type="submit" id="logout" value="logout">
</form>
<form method="get" th:action="@{/account/update}">
<input type="submit" name="form1" id="updateAccount" value="Account Update">
</form>
</div>
<br>
<br>
<div class="container">
<table>
<tr>
<th>Name</th>
<td id="name" th:text="${goods.name}"></td>
<td></td>
</tr>
<tr>
<th>Price</th>
<td id="price" th:text="|¥${#numbers.formatInteger(goods.price, 1, 'COMMA')}|"></td>
</tr>
<tr>
<th>Description</th>
<td id="description" th:text="${goods.description}"></td>
</tr>
</table>
<form method="post" th:action="@{/goods/addToCart}" th:object="${AddToCartForm}">
Quantity<input type="text" name="quantity" id="quantity" value="1">
<input type="hidden" name="goodsId" th:value="${goods.id}">
<input type="submit" id="add" value="add">
</form>
<form method="get" th:action="@{/goods}">
<input type="submit" id="home" value="home">
</form>
</div>
<div>
<form method="get" th:action="@{/cart}">
<input type="submit" value="view cart">
</form>
<table>
<tr th:each="cartItem, status : ${@cart.cartItems}" th:object="${cartItem}">
<td th:id="|itemName${status.index}|" th:text="*{goods.name}"></td>
<td th:id="|itemPrice${status.index}|" th:text="|¥*{#numbers.formatInteger(goods.price, 1, 'COMMA')}|"></td>
<td th:id="|itemQuantity${status.index}|" th:text="*{quantity}"></td>
</tr>
<tr>
<td>Total</td>
<td id="totalPrice" th:text="|¥${#numbers.formatInteger(@cart.totalAmount, 1, 'COMMA')}|"></td>
<td></td>
</tr>
</table>
</div>
</body>
</html>
11.3.5.2.5. 動作確認
ここまでの実装でカートに商品を登録することができるようになっている。 商品一覧表示画面で、ある商品の「add」のボタンを押下することで、同ページカートの中身が表示されるようになる。
ここまでの実装でカートオブジェクトをセッションに格納しているため、 アカウント情報更新画面に遷移して戻ってきてもカートの情報は保存されている。
11.3.5.3. 商品検索情報を保持する仕組みを作成する
ここまでの実装で商品をカートに追加することはできるようになった。 しかし、商品追加後に遷移する画面は、常に「book」カテゴリの1ページ目となっている。
本チュートリアルでは、選択カテゴリやページ番号といった商品検索情報は注文が完了するまで保持する仕様となっている。 そのため、商品追加後やアカウント更新画面から戻ってきたときに前の状態に遷移するように実装を修正する。
アプリケーションの設計 で説明したとおり、商品検索情報はセッションスコープのBeanとして管理する。
以下に修正する画面の情報を示す。
処理名 HTTPメソッド パス 画面
11.3.5.3.1. セッションスコープBeanを作成
商品検索情報を保持するセッションスコープBeanを作成する。 カート情報と同様にcomponent-scanを使用してbeanを定義する。
/session-tutorial-init-web/src/main/java/com/example/session/app/goods/GoodsSearchCriteria.java
package com.example.session.app.goods;

import java.io.Serializable;

import org.springframework.context.annotation.Scope;
import org.springframework.context.annotation.ScopedProxyMode;
import org.springframework.stereotype.Component;

@Component // (1)
@Scope(value = "session", proxyMode = ScopedProxyMode.TARGET_CLASS) // (2)
public class GoodsSearchCriteria implements Serializable {

    /**
     *
     */
    private static final long serialVersionUID = 1L;

    private int categoryId = 1;

    private int page = 0;

    public int getCategoryId() {
        return categoryId;
    }

    public void setCategoryId(int categoryId) {
        this.categoryId = categoryId;
    }

    public int getPage() {
        return page;
    }

    public void setPage(int page) {
        this.page = page;
    }

    public void clear() {
        categoryId = 1;
        page = 0;
    }

}
| 項番 | 説明 |
|---|---|
(1)
|
component-scanの対象となるように
@Componentアノテーションを指定する |
(2)
|
Beanのスコープを
sessionにする。また、proxyMode 属性でScopedProxyMode.TARGET_CLASSを指定し、scoped-proxyを有効にする。 |
また、component-scanの対象となるbase-packageをBean定義ファイルに指定する必要がある。 しかし、本チュートリアルでは作成済みのBean定義ファイルにすでに以下の記述があるため、新たに記述を追加する必要はない。
/session-tutorial-init-web/src/main/resources/META-INF/spring/spring-mvc.xml
<!-- (1) -->
<context:component-scan base-package="com.example.session.app" />
| 項番 | 説明 |
|---|---|
(1)
|
component-scanの対象となるパッケージを指定する。
|
11.3.5.3.2. Controllerの修正
商品検索情報をセッションで保持する、また、セッションで保持されている商品検索情報を利用するようにControllerを修正する。
/session-tutorial-init-web/src/main/java/com/example/session/app/goods/GoodsController.java
package com.example.session.app.goods;

import javax.inject.Inject;

import org.springframework.data.domain.Page;
import org.springframework.data.domain.PageRequest;
import org.springframework.data.domain.Pageable;
import org.springframework.stereotype.Controller;
import org.springframework.ui.Model;
import org.springframework.validation.BindingResult;
import org.springframework.validation.annotation.Validated;
import org.springframework.web.bind.annotation.GetMapping;
import org.springframework.web.bind.annotation.ModelAttribute;
import org.springframework.web.bind.annotation.PathVariable;
import org.springframework.web.bind.annotation.PostMapping;
import org.springframework.web.bind.annotation.RequestMapping;
import org.springframework.web.servlet.mvc.support.RedirectAttributes;
import org.terasoluna.gfw.common.message.ResultMessages;

import com.example.session.domain.model.Cart;
import com.example.session.domain.model.CartItem;
import com.example.session.domain.model.Goods;
import com.example.session.domain.service.goods.GoodsService;

@Controller
@RequestMapping("goods")
public class GoodsController {

    @Inject
    GoodsService goodsService;

    @Inject
    Cart cart;

    // (1)
    @Inject
    GoodsSearchCriteria criteria;

    @ModelAttribute(value = "goodViewForm")
    public GoodViewForm setUpCategoryId() {
        return new GoodViewForm();
    }

    // (2)
    @GetMapping
    public String showGoods(GoodViewForm form, Model model) {
        Pageable pageable = PageRequest.of(criteria.getPage(), 3);
        form.setCategoryId(criteria.getCategoryId());
        return showGoods(pageable, model);
    }

    // (3)
    @GetMapping(params = "categoryId")
    public String changeCategoryId(GoodViewForm form, Pageable pageable, Model model) {
        criteria.setPage(pageable.getPageNumber());
        criteria.setCategoryId(form.getCategoryId());
        return showGoods(pageable, model);
    }

    // (4)
    @GetMapping(params = "page")
    public String changePage(GoodViewForm form, Pageable pageable, Model model) {
        criteria.setPage(pageable.getPageNumber());
        form.setCategoryId(criteria.getCategoryId());
        return showGoods(pageable, model);
    }

    // (5)
    String showGoods(Pageable pageable, Model model) {
        Page<Goods> page = goodsService.findByCategoryId(
                criteria.getCategoryId(), pageable);
        model.addAttribute("page", page);
        return "goods/showGoods";
    }

    @GetMapping("/{goodsId}")
    public String showGoodsDetail(@PathVariable String goodsId, Model model) {

        Goods goods = goodsService.findOne(goodsId);
        model.addAttribute(goods);

        return "/goods/showGoodsDetail";
    }

    @PostMapping("/addToCart")
    public String addToCart(@Validated GoodAddForm form, BindingResult result,
            RedirectAttributes attributes) {

        if (result.hasErrors()) {
            ResultMessages messages = ResultMessages.error()
                    .add("e.st.go.5001");
            attributes.addFlashAttribute(messages);
            return "redirect:/goods";
        }

        Goods goods = goodsService.findOne(form.getGoodsId());
        CartItem cartItem = new CartItem();
        cartItem.setGoods(goods);
        cartItem.setQuantity(form.getQuantity());
        cart.add(cartItem);

        return "redirect:/goods";
    }
}
| 項番 | 説明 |
|---|---|
(1)
|
セッションスコープのBeanをDIコンテナから取得する。
|
(2)
|
通常の商品一覧画面表示処理の前処理を行う。セッションに格納されている商品カテゴリをフォームに、ページ番号を
pageableに設定する。商品カテゴリをフォームに設定するのは、セレクトボックスで表示される商品カテゴリを指定するためである。 |
(3)
|
カテゴリが変更された時の商品一覧画面表示処理の前処理を行う。入力された商品カテゴリをセッションに格納する。ページ番号はデフォルトの1ページ目を
pageableに指定する。 |
(4)
|
ページが変更された時の商品一覧画面表示処理の前処理を行う。入力されたページ番号をセッションに格納する。セッションに格納されている商品カテゴリをフォームに設定する。
|
(5)
|
共通部分を扱う。セッションで管理されている商品カテゴリ、前処理で取得した
pageableをもとに商品を検索する。 |
11.3.5.3.3. 動作確認
ここまでの実装で、商品検索情報を保持することができるようになっている。 例えば、「music」カテゴリの2ページ目で商品をカートに追加した際の遷移先がもとの「music」カテゴリの2ページ目のままとなる。 また、同画面から「Account Update」ボタンを押してアカウント更新画面に遷移し、アカウント更新画面の「home」ボタンを押して戻ってきた際の遷移先がもとの「music」カテゴリの2ページ目のままとなる。
11.3.5.4. カートアイテム削除機能を作成する
指定した商品をカートから削除する機能を作成する。
削除する商品を指定するために、チェックボックスを利用する。
以下にカートアイテム削除機能で実装する画面の情報を示す。
処理名 HTTPメソッド パス 画面
11.3.5.4.1. フォームオブジェクトの作成
削除対象となる商品のIDを保持するクラスを作成する。
/session-tutorial-init-web/src/main/java/com/example/session/app/cart/CartForm.java
package com.example.session.app.cart;

import java.util.Set;

import javax.validation.constraints.NotEmpty;

public class CartForm {

    @NotEmpty
    private Set<String> removedItemsIds;

    public Set<String> getRemovedItemsIds() {
        return removedItemsIds;
    }

    public void setRemovedItemsIds(Set<String> removedItemsIds) {
        this.removedItemsIds = removedItemsIds;
    }
}
11.3.5.4.2. Controllerの作成
Controllerを作成する。
/session-tutorial-init-web/src/main/java/com/example/session/app/cart/CartController.java
package com.example.session.app.cart;

import javax.inject.Inject;

import org.springframework.stereotype.Controller;
import org.springframework.ui.Model;
import org.springframework.validation.BindingResult;
import org.springframework.validation.annotation.Validated;
import org.springframework.web.bind.annotation.GetMapping;
import org.springframework.web.bind.annotation.ModelAttribute;
import org.springframework.web.bind.annotation.PostMapping;
import org.springframework.web.bind.annotation.RequestMapping;
import org.terasoluna.gfw.common.message.ResultMessages;

import com.example.session.domain.model.Cart;

@Controller
@RequestMapping("cart")
public class CartController {

    // (1)
    @Inject
    Cart cart;

    @ModelAttribute
    CartForm setUpForm() {
        return new CartForm();
    }

    @GetMapping
    public String viewCart(Model model) {
        return "cart/viewCart";
    }

    @PostMapping
    public String removeFromCart(@Validated CartForm cartForm,
            BindingResult bindingResult, Model model) {
        if (bindingResult.hasErrors()) {
            ResultMessages messages = ResultMessages.error()
                    .add("e.st.ca.5001");
            model.addAttribute(messages);
            return viewCart(model);
        }
        cart.remove(cartForm.getRemovedItemsIds()); // (2)
        return "redirect:/cart";
    }
}
| 項番 | 説明 |
|---|---|
(1)
|
セッションスコープのBeanをDIコンテナから取得する。
|
(2)
|
セッションスコープのBeanのデータを削除する。
|
11.3.5.4.3. テンプレートHTMLの作成
カート一覧を表示し、削除したい商品を選択するためのHTMLを作成する。 この画面から商品注文が行える。
/session-tutorial-init-web/src/main/webapp/WEB-INF/views/cart/viewCart.html
<!DOCTYPE html>
<html xmlns:th="http://www.thymeleaf.org"
xmlns:sec="http://www.thymeleaf.org/extras/spring-security"
th:replace="~{layout/template :: layout(~{::title},~{::body/content()})}">
<head>
<title>View Cart Page</title>
</head>
<body>
<div style="display: inline-flex">
welcome <span id="userName" sec:authentication="principal.account.name"></span>
<form method="post" th:action="@{/logout}">
<input type="submit" id="logout" value="logout">
</form>
<form method="get" th:action="@{/account/update}">
<input type="submit" name="form1" id="updateAccount" value="Account Update">
</form>
</div>
<br>
<br>
<div>
<form method="post" th:action="@{/cart}" th:object="${cartForm}">
<div th:if="${cartForm != null}">
<span id="removedItemsIds-errors" th:errors="*{removedItemsIds}" class="error-messages"></span>
</div>
<div th:if="${resultMessages != null}" th:class="|alert alert-${resultMessages.type}|">
<ul>
<li th:each="message : ${resultMessages}" th:text="${#messages.msgWithParams(message.code, message.args)}"></li>
</ul>
</div>
<table>
<tr>
<th>Name</th>
<th>Price</th>
<th>Quantity</th>
<th>Remove</th>
</tr>
<tr th:each="cartItem, status : ${@cart.cartItems}" th:object="${cartItem}">
<td th:id="|itemName${status.index}|" th:text="*{goods.name}"></td>
<td th:id="|itemPrice${status.index}|" th:text="|¥*{#numbers.formatInteger(goods.price, 1, 'COMMA')}|"></td>
<td th:id="|itemQuantity${status.index}|" th:text="*{quantity}"></td>
<!--/* (1) */-->
<td><input type="checkbox" name="removedItemsIds" th:id="|removedItemsIds${status.index}|" th:value="*{goods.id}"></td>
</tr>
<tr>
<td>Total</td>
<td id="totalPrice" th:text="|¥${#numbers.formatInteger(@cart.totalAmount, 1, 'COMMA')}|"></td>
<td></td>
<td></td>
</tr>
</table>
<input type="submit" id="remove" value="remove">
</form>
</div>
<div style="display: inline-flex">
<form method="get" th:action="@{/order}">
<input type="submit" name="confirm" id="confirm" value="confirm your order">
</form>
<form method="get" th:action="@{/goods}">
<input type="submit" id="home" value="home">
</form>
</div>
</body>
</html>
| 項番 | 説明 |
|---|---|
(1)
|
チェックボックスを利用して、削除する商品を指定する。
チェックボックスが選択された状態で削除ボタンが押されると、該当商品のIDがサーバに送信される。
|
11.3.5.4.4. 動作確認
ここまでの実装でカートに登録された商品を削除することができるようになっている。 商品一覧表示画面で「viewCart」ボタンを押下することでカート表示画面に遷移する。 カート表示画面で削除したい商品をチェックして「remove」ボタンを押すことで、商品をカートから削除できる。
11.3.5.5. 商品注文機能を作成する
カートに登録されている商品を注文する機能を作成する。
注文完了後カートの中身は空になる。
以下に商品注文機能で実装する画面の情報を示す。
処理名 HTTPメソッド パス 画面
11.3.5.5.1. Controllerの作成
Controllerを作成する。
/session-tutorial-init-web/src/main/java/com/example/session/app/order/OrderController.java
package com.example.session.app.order;

import javax.inject.Inject;

import org.springframework.http.HttpStatus;
import org.springframework.security.core.annotation.AuthenticationPrincipal;
import org.springframework.stereotype.Controller;
import org.springframework.ui.Model;
import org.springframework.web.bind.annotation.ExceptionHandler;
import org.springframework.web.bind.annotation.GetMapping;
import org.springframework.web.bind.annotation.PostMapping;
import org.springframework.web.bind.annotation.RequestMapping;
import org.springframework.web.bind.annotation.RequestParam;
import org.springframework.web.bind.annotation.ResponseStatus;
import org.springframework.web.servlet.ModelAndView;
import org.springframework.web.servlet.mvc.support.RedirectAttributes;
import org.terasoluna.gfw.common.exception.BusinessException;
import org.terasoluna.gfw.common.message.ResultMessages;

import com.example.session.app.goods.GoodsSearchCriteria;
import com.example.session.domain.model.Cart;
import com.example.session.domain.model.Order;
import com.example.session.domain.service.order.EmptyCartOrderException;
import com.example.session.domain.service.order.InvalidCartOrderException;
import com.example.session.domain.service.order.OrderService;
import com.example.session.domain.service.userdetails.AccountDetails;

@Controller
@RequestMapping("order")
public class OrderController {

    @Inject
    OrderService orderService;

    // (1)
    @Inject
    Cart cart;

    @Inject
    GoodsSearchCriteria criteria;

    @GetMapping(params = "confirm")
    public String confirm(@AuthenticationPrincipal AccountDetails userDetails,
            Model model) {
        if (cart.isEmpty()) {
            ResultMessages messages = ResultMessages.error()
                    .add("e.st.od.5001");
            model.addAttribute(messages);
            return "cart/viewCart";
        }
        model.addAttribute("account", userDetails.getAccount());
        model.addAttribute("signature", cart.calcSignature());
        return "order/confirm";
    }

    @PostMapping
    public String order(@AuthenticationPrincipal AccountDetails userDetails,
            @RequestParam String signature, RedirectAttributes attributes) {
        Order order = orderService.purchase(userDetails.getAccount(), cart,
                signature); // (2)
        attributes.addFlashAttribute(order);
        criteria.clear(); // (3)
        return "redirect:/order?finish";
    }

    @GetMapping(params = "finish")
    public String finish() {
        return "order/finish";
    }

    // (4)
    @ExceptionHandler({ EmptyCartOrderException.class,
            InvalidCartOrderException.class })
    @ResponseStatus(HttpStatus.CONFLICT)
    ModelAndView handleOrderException(BusinessException e) {
        return new ModelAndView("common/error/businessError").addObject(e
                .getResultMessages());
    }
}
| 項番 | 説明 |
|---|---|
(1)
|
セッションスコープのBeanをDIコンテナから取得する。
|
(2)
|
ドメイン層にあるServiceのメソッドにて、セッションスコープのBeanの中身を空にしている。
これによりセッションスコープのBeanの破棄が行われたことになる。
また、今回のアプリケーションでは、セッションスコープのBeanにある情報をBean破棄後に遷移する画面で使用する。
そのため、セッションスコープのBeanにあった情報を別のオブジェクトに入れなおしてフラッシュスコープに追加している。
|
(3)
|
商品検索情報をデフォルト状態に戻している。
|
(4)
|
ServiceのメソッドでBusiness例外が発生する可能性があるため、このメソッドでエラーハンドリングを行っている。
これにより、Business例外が発生した場合、指定したエラー画面に遷移することになる。
|
Warning
セッションスコープのBeanの破棄を行う方法は @SessionAttributes で管理させるオブジェクトの破棄方法とは異なる。
セッションスコープBeanの破棄はDIコンテナに任せるべきであり、アプリケーションから破棄すべきでない。
そのため、セッションスコープのBeanの破棄を行うには、セッションスコープBeanのフィールドをリセットするだけで良い。
セッションタイムアウト時またはログアウト時にBean自体が破棄される。
11.3.5.5.2. テンプレートHTMLの作成
注文内容と支払情報を表示するHTMLを作成する。
/session-tutorial-init-web/src/main/webapp/WEB-INF/views/order/confirm.html
<!DOCTYPE html>
<html xmlns:th="http://www.thymeleaf.org"
xmlns:sec="http://www.thymeleaf.org/extras/spring-security"
th:replace="~{layout/template :: layout(~{::title},~{::body/content()})}">
<head>
<title>Order Page</title>
</head>
<body>
<div style="display: inline-flex">
welcome <span id="userName" sec:authentication="principal.account.name"></span>
<form method="post" th:action="@{/logout}">
<input type="submit" id="logout" value="logout">
</form>
<form method="get" th:action="@{/account/update}">
<input type="submit" name="form1" id="updateAccount" value="Account Update">
</form>
</div>
<br>
<br>
<div>
<h3>Below items will be ordered. Please push "order" button if it's OK.</h3>
<table>
<tr>
<th>Name</th>
<th>Price</th>
<th>Quantity</th>
</tr>
<tr th:each="cartItem, status : ${@cart.cartItems}" th:object="${cartItem}">
<td th:id="|itemName${status.index}|" th:text="*{goods.name}"></td>
<td th:id="|itemPrice${status.index}|" th:text="|¥*{#numbers.formatInteger(goods.price, 1, 'COMMA')}|"></td>
<td th:id="|itemQuantity${status.index}|" th:text="*{quantity}"></td>
</tr>
<tr>
<td>Total</td>
<td id="totalPrice" th:text="|¥${#numbers.formatInteger(@cart.totalAmount, 1, 'COMMA')}|"></td>
<td></td>
</tr>
</table>
<table th:object="${account}">
<tr>
<td><label for="name">name</label></td>
<td id="name" th:text="*{name}"></td>
</tr>
<tr>
<td><label for="email">e-mail</label></td>
<td id="email" th:text="*{email}"></td>
</tr>
<tr>
<td><label for="zip">zip</label></td>
<td id="zip" th:text="*{zip}"></td>
</tr>
<tr>
<td><label for="address">address</label></td>
<td id="address" th:text="*{address}"></td>
</tr>
<tr>
<!--/* (1) */-->
<td>payment</td>
<td th:switch="*{cardNumber}">
<span id="payment" th:case="null">cash</span>
<span id="payment" th:case="*" th:text="|card (card number : ****-****-****-*{lastFourOfCardNumber})|"></span>
</td>
</tr>
</table>
</div>
<div style="display: inline-flex">
<form method="post" th:action="@{/order}">
<input type="hidden" name="signature" th:value="${signature}">
<input type="submit" id="order" value="order">
</form>
<form method="get" th:action="@{/cart}">
<input type="submit" id="back" value="back">
</form>
</div>
<div>
<form method="get" th:action="@{/goods}">
<input type="submit" id="home" value="home">
</form>
</div>
</body>
</html>
| 項番 | 説明 |
|---|---|
(1)
|
アカウント情報としてカード番号が登録されている場合支払方法がカード払いとなる。
カード番号が登録されている場合、カード番号の下4桁以外が「*」でマスキングされて表示される。
登録されていない場合は現金払いとなる。
|
注文確定後の情報を表示するHTMLを作成する。
/session-tutorial-init-web/src/main/webapp/WEB-INF/views/order/finish.html
<!DOCTYPE html>
<html xmlns:th="http://www.thymeleaf.org"
xmlns:sec="http://www.thymeleaf.org/extras/spring-security"
th:replace="~{layout/template :: layout(~{::title},~{::body/content()})}">
<head>
<title>Order Page</title>
</head>
<body>
<div style="display: inline-flex">
welcome <span id="userName" sec:authentication="principal.account.name"></span>
<form method="post" th:action="@{/logout}">
<input type="submit" id="logout" value="logout">
</form>
<form method="get" th:action="@{/account/update}">
<input type="submit" name="form1" id="updateAccount" value="Account Update">
</form>
</div>
<br>
<br>
<div>
<h3>Your order has been accepted</h3>
<table>
<tr>
<td><label for="orderNumber">order number</label></td>
<td id="orderNumber" th:text="${order.id}"></td>
</tr>
<tr>
<td><label for="orderDate">order date</label></td>
<td id="orderDate" th:text="${#dates.format(order.orderDate, 'yyyy-MM-dd hh:mm:ss')}"></td>
</tr>
</table>
<table>
<tr>
<th>Name</th>
<th>Price</th>
<th>Quantity</th>
</tr>
<tr th:each="orderLine, status : ${order.orderLines}" th:object="${orderLine}">
<td th:id="|itemName${status.index}|" th:text="*{goods.name}"></td>
<td th:id="|itemPrice${status.index}|" th:text="|¥*{#numbers.formatInteger(goods.price, 1, 'COMMA')}|"></td>
<td th:id="|itemQuantity${status.index}|" th:text="*{quantity}"></td>
</tr>
<tr>
<td>Total</td>
<td id="totalPrice" th:text="|¥${#numbers.formatInteger(order.totalAmount, 1, 'COMMA')}|"></td>
<td></td>
</tr>
</table>
</div>
<div>
<form method="get" th:action="@{/goods}">
<input type="submit" id="home" value="home">
</form>
</div>
</body>
</html>
11.3.5.5.3. 動作確認
ここまでの実装でカートに登録された商品を注文することができるようになっている。 カート表示画面で「confirm your order」ボタンを押下することで注文確認画面に遷移する。 注文確認画面で「order」ボタンを押下することで、注文が完了する。
ここまでの実装で、注文完了時にセッションにあるカートオブジェクトが削除される。 そのため、注文完了後に商品一覧画面に戻るとカートの中身がクリアされている。
11.3.5.6. セッションの同期化とタイムアウトの設定
最後にセッション同期化とタイムアウトの設定を行う。
セッションの同期化はBeanProcessorを利用して実現する。
/session-tutorial-init-web/src/main/java/com/example/session/app/config/EnableSynchronizeOnSessionPostProcessor.java
package com.example.session.app.config;

import org.springframework.beans.BeansException;
import org.springframework.beans.factory.config.BeanPostProcessor;
import org.springframework.web.servlet.mvc.method.annotation.RequestMappingHandlerAdapter;

public class EnableSynchronizeOnSessionPostProcessor implements
        BeanPostProcessor {

    @Override
    public Object postProcessBeforeInitialization(Object bean, String beanName)
            throws BeansException {
        return bean;
    }

    @Override
    public Object postProcessAfterInitialization(Object bean, String beanName)
            throws BeansException {
        if (bean instanceof RequestMappingHandlerAdapter) {
            RequestMappingHandlerAdapter adapter = (RequestMappingHandlerAdapter) bean;
            adapter.setSynchronizeOnSession(true); // (1)
        }
        return bean;
    }
}
| 項番 | 説明 |
|---|---|
(1)
|
setSynchronizeOnSessionメソッドの引数にtrueを指定することで、同一セッション内でのリクエストが同期化される。
|
/session-tutorial-init-web/src/main/resources/META-INF/spring/spring-mvc.xml
<!-- Bean Processor -->
<bean class="com.example.session.app.config.EnableSynchronizeOnSessionPostProcessor" />
タイムアウト時間はweb.xmlで設定する。 デフォルト値の30分を採用する。
/session-tutorial-init-web/src/main/webapp/WEB-INF/web.xml (デフォルトで設定済み)
<session-config>
    <!-- 30min -->
    <session-timeout>30</session-timeout>
    <cookie-config>
        <http-only>true</http-only>
        <!-- <secure>true</secure> -->
    </cookie-config>
    <tracking-mode>COOKIE</tracking-mode>
</session-config>
タイムアウト後のリクエスト検知はSpring Securityの機能を利用する。
/session-tutorial-init-web/src/main/resources/META-INF/spring/spring-security.xml
<!-- (1) -->
<sec:session-management invalid-session-url="/loginForm" />
| 項番 | 説明 |
|---|---|
(1)
|
sec:session-management タグの invalid-session-url 属性にタイムアウト後のリクエストを検知した際の遷移先を記述する。 |
11.3.6. 終わりに
本チュートリアルでは以下の内容を学習した。
- セッション管理対象となるデータの設計方法
- セッションに格納するデータの選択
- セッションを利用するか否かの判断フローの一例
- セッション中のデータの破棄
- 本FWにおけるセッションの具体的な利用方法
@SessionAttributesを使用する方法- セッションスコープのBeanを使用する方法
- 各利用方法におけるセッション内データの参照方法
- 各利用方法におけるセッションの破棄方法
